

0x01 前言
之前被面试也有问过这些问题,感觉自己还没有复现过这类漏洞,但因为之前也学过 shiro 的使用,今天就看一下这几个洞。
Shiro 权限绕过漏洞
| CVE编号 | 漏洞说明 | 漏洞版本 |
|---|---|---|
| CVE-2010-3863 | 未能对传入的 url 编码进行 decode 解码 | shrio <=1.0.0 |
| CVE-2016-6802 | Context Path 路径标准化导致绕过 | shrio <1.3.2 |
| CVE-2020-1957 | Spring 与 Shiro 对于 "/" 和 ";" 处理差异导致绕过 | Shiro <= 1.5.1 |
| CVE-2020-11989 | Shiro 二次解码导致的绕过以及 ContextPath 使用 ";" 的绕过 | shiro < 1.5.3 |
| CVE-2020-13933 | 由于 Shiro 与 Spring 处理路径时 URL 解码和路径标准化顺序不一致 导致的使用 "%3b" 的绕过 | shiro < 1.6.0 |
| CVE-2020-17510 | 由于 Shiro 与 Spring 处理路径时 URL 解码和路径标准化顺序不一致 导致的使用 "%2e" 的绕过 | Shiro < 1.7.0 |
| CVE-2020-17523 | Shiro 匹配鉴权路径时会对分隔的 token 进行 trim 操作 导致的使用 "%20" 的绕过 | Shiro <1.7.1 |
| CVE-2021-41303 | Shiro 匹配鉴权路径时会经过多重比较 | Shiro =1.7.1 |
0x02 Shiro 流程分析
环境搭建
要实现 Shiro 的使用,需要实现三个模块;并且是自上而下实现的
-
创建 realm 对象,需要自定义类
-
DefaultWebSecurityManager
-
ShiroFilterFactoryBean
关于环境搭建与开发学习可以具体看我这一篇文章,这里不再赘述 http://localhost:4000/2022/07/07/Java%E5%BC%80%E5%8F%91%E4%B9%8Bshiro%E5%AD%A6%E4%B9%A0/
可以用我已经搭建好的现成环境,需要配置一下 SQL
https://github.com/Drun1baby/JavaSecurityLearning/tree/main/JavaSecurity/Shiro/shiro
其中关键代码在这儿
ShiroConfig.java
@Configuration
public class ShiroConfig {
    // ShiroFilterFactoryBean
    @Bean
    public ShiroFilterFactoryBean getShiroFilterFactoryBean(
            @Qualifier("getDefaultWebSecurityManager") DefaultWebSecurityManager defaultWebSecurityManager){
        ShiroFilterFactoryBean bean = new ShiroFilterFactoryBean();
        // 设置安全管理器
        bean.setSecurityManager(defaultWebSecurityManager);

        // 添加 shiro 的内置过滤器
        /*
        anon:无需认证即可访问
        authc:必须认证了才能访问
        user:必须拥有 记住我功能才能使用
        perms:拥有对某个资源的权限才能访问
        role:拥有某个角色权限
         */
        // 拦截
        Map<String, String > filterMap = new LinkedHashMap<>();

        filterMap.put("/user/add","perms[user:add]");
        filterMap.put("/user/update","perms[user:update]");

        filterMap.put("/user/*", "authc");
        bean.setFilterChainDefinitionMap(filterMap);

        bean.setLoginUrl("/toLogin");
        bean.setUnauthorizedUrl("/noauth");
        return bean;
    }

    // DefaultWebSecurityManager
    @Bean
    public DefaultWebSecurityManager getDefaultWebSecurityManager(@Qualifier("userRealm") UserRealm userRealm){
        DefaultWebSecurityManager securityManager = new DefaultWebSecurityManager();

        // 关联 UserRealm        securityManager.setRealm(userRealm);
        return securityManager;
    }

    // 创建 realm 对象
    @Bean
    public UserRealm userRealm(){
        return new UserRealm();
    }
}
以及 UserRealm.java
// 自定义的 Realmpublic class UserRealm extends AuthorizingRealm {

    @Autowired
    UserService userService;

    // 授权
    @Override
    protected AuthorizationInfo doGetAuthorizationInfo(PrincipalCollection principals) {
        System.out.println("执行了=>授权doGetAuthorizationInfo");

        SimpleAuthorizationInfo info = new SimpleAuthorizationInfo();

        Subject subject = SecurityUtils.getSubject();
        User currentUser = (User) subject.getPrincipal();

        info.addStringPermission(currentUser.getPerms());
        return info;
    }

    @Override
    protected AuthenticationInfo doGetAuthenticationInfo(AuthenticationToken token) throws AuthenticationException {
        System.out.println("执行了=>认证doGetAuthorizationInfo");

        // 数据库中取用户名与密码

        UsernamePasswordToken userToken = (UsernamePasswordToken) token;

        User user = userService.queryUserByName(userToken.getUsername());

        if (user == null){
            return null; // 自动抛出异常
        }

        // 密码认证,shiro 完成
        return new SimpleAuthenticationInfo(user,user.getPwd(),"");
    }
}
Shiro 认证流程分析
初始化
ShiroFilterFactoryBean类实现了FactoryBean接口,那么 Spring 在初始化的时候必然会调用ShiroFilterFactoryBean.getObject()方法获取实例
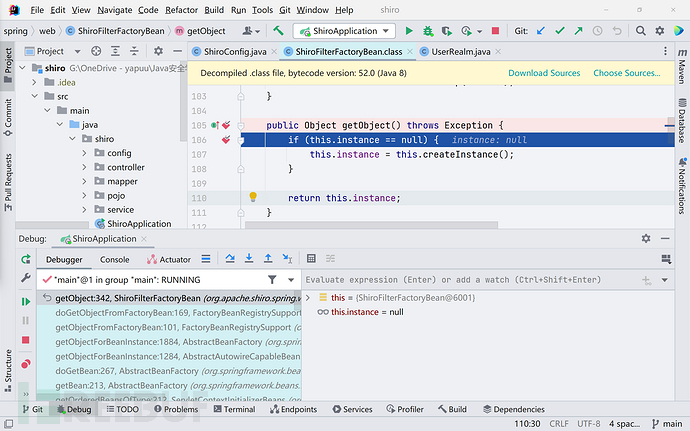
在getObject()方法中会调用createInstance()方法,跟进。
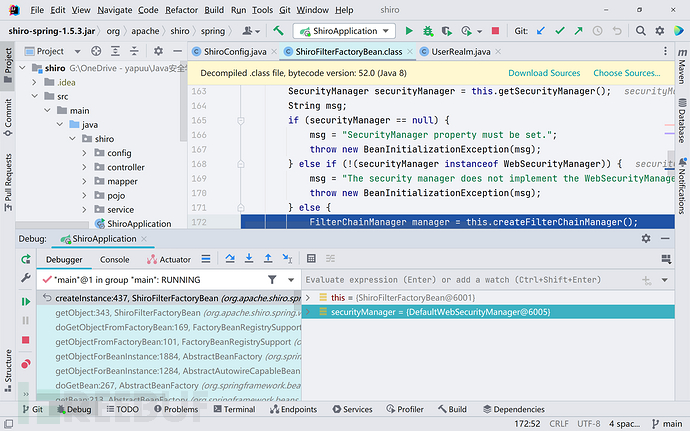
先获取到我们配置的SecurityManager,这个获取是向上获取的,也就是去找ShiroConfig这个文件当中的SecurityManager,在这里是ShiroConfig#DefaultWebSecurityManager
接着往下判断securityManager是否为 null,以及是否为WebSecurityManager,如果是的话就抛出异常。如果不是的话,则创建一个FilterChainManager,这个类的主要功能是链式过滤。我们跟进看一下这个类是怎么被创建出来的,以及其中存储了哪些信息。
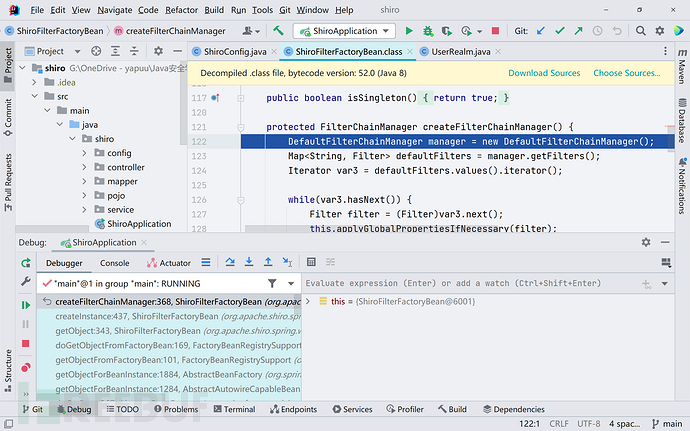
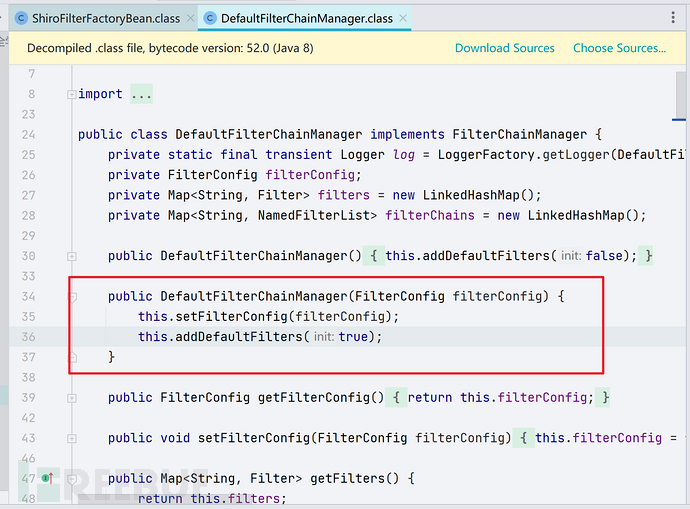
第一步 new 了一个DefaultFilterChainManager类,在它的构造方法中将 filters 和 filterChains 两个成员变量都初始化为一个能保持插入顺序的LinkedHashMap,之后再调用addDefaultFilters()方法添加 Shiro 内置的一些过滤器。
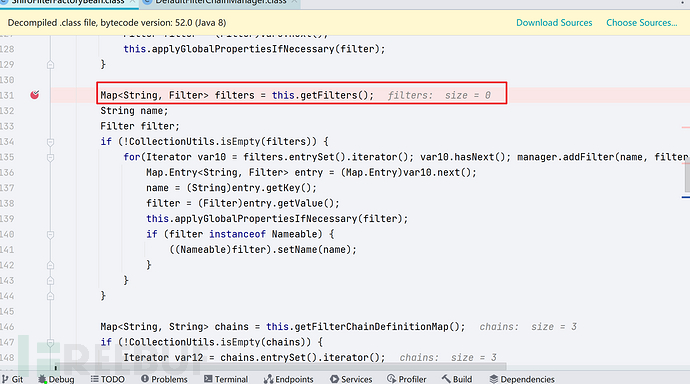
往下,将所有的 filters 保存到了 var3 这个迭代器中,再将 var3 丢进循环里面
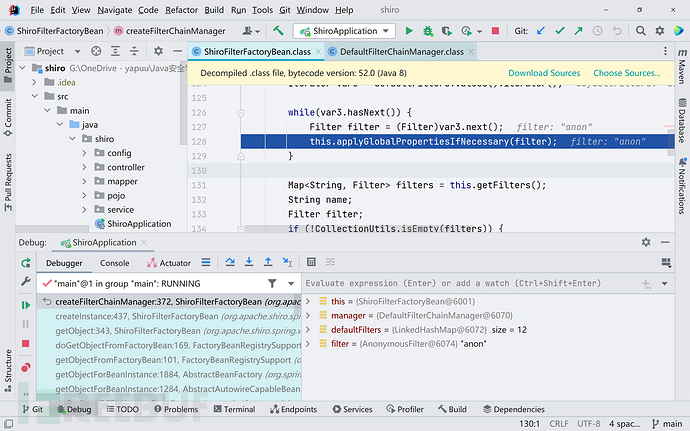
applyGlobalPropertiesIfNecessary()方法遍历过滤器,并给过滤器添加了很多属性
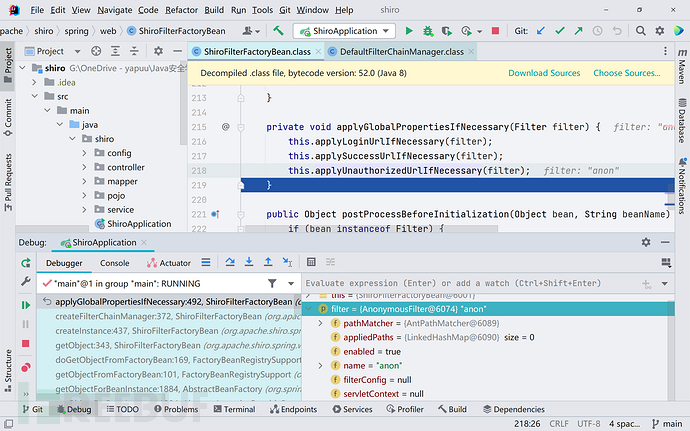
在这个方法中调用了三个方法,三个方法逻辑是一样的,分别是设置loginUrl、successUrl和unauthorizedUrl,我们就看第一个applyLoginUrlIfNecessary,跟进
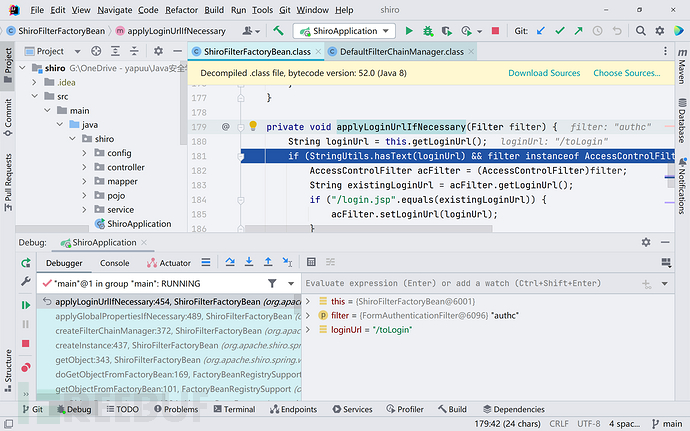
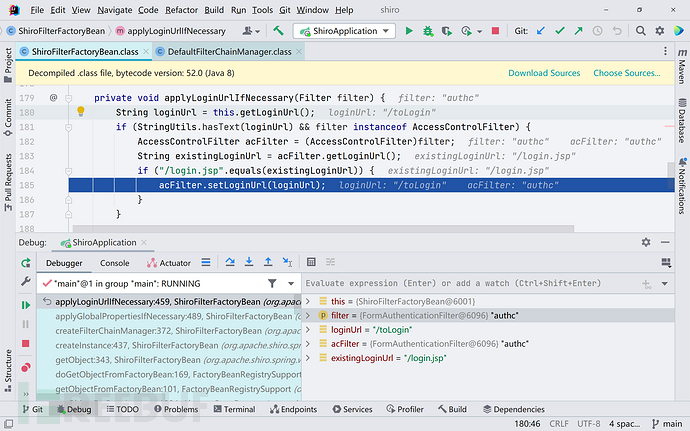
这个方法做的业务是将loginUrl赋值给 filter 去,在代码当中的逻辑是这样的;如果我们配置了loginUrl,那么会将AccessControlFilter中默认的loginUrl替换为我们设置的值,默认的loginUrl为/login.jsp
后面两个方法道理一样,都是将我们设置的参数替换进去,只不过第三个认证失败跳转 URL 的默认值为 null。
这里的this.getLoginUrl();是从我们 shiroFilter Bean 中,setLoginUrl的值
-
回到
org.apache.shiro.spring.web.ShiroFilterFactoryBean#createFilterChainManager代码中
在迭代器工作结束之后,继续往下看。先获取到自定义的过滤器,将内容保存在filters中,filters变量默认为空,如果我们配置了自定义的过滤器,那么会将其添加到 filters 中。
继续往下,通过getFilterChainDefinitionMap()方法把自定义过滤器的规则拿出来,并放进迭代器循环。
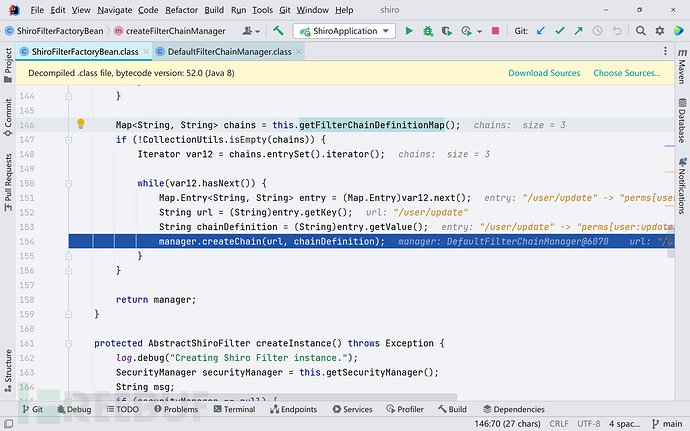
跟进createChain()方法,chainName是我们配置的过滤路径,chainDefinition是该路径对应的过滤器,通常我们都是一对一的配置,比如:filterMap.put("/login", "anon");,但看到这个方法我们知道了一个过滤路径其实是可以通过传入["filter1","filter2"...]配置多个过滤器的。在这里会根据我们配置的过滤路径和过滤器映射关系一步步配置过滤器执行链。
-
其实这也就是之前说的,shiro 支持链语句表达式
将 shiro 规则拿出来之后,会进行循环迭代,将原本的规则数据 ————perms[user:update]转换为["perms","user:update"],再调用addToChain()方法将规则添加到对应的 chain 中,跟进addToChain()方法

addToChain()方法先从 filters 中根据 filterName 获取对应过滤器,然后调用ensureChain()方法,ensureChain()方法会先从 filterChains 根据 chainName 获取 NamedFilterList,获取不到就创建一个并添加到 filterChains 然后返回。
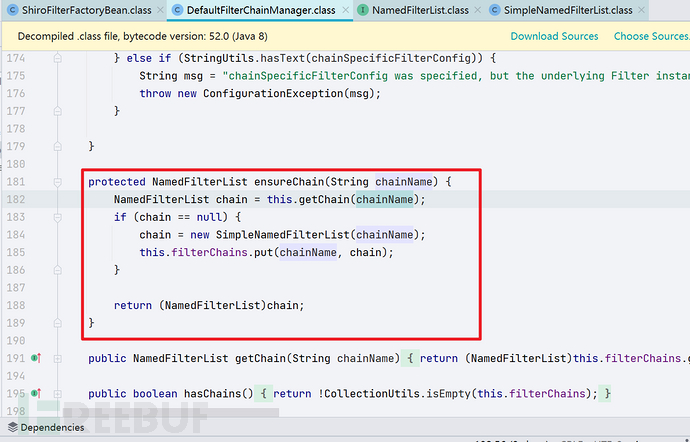
因为过滤路径和过滤器是一对多的关系,所以ensureChain()方法返回的NamedFilterList其实就是一个有着 name 称属性的List<Filter>,这个 name 保存的就是过滤路径,List 保存着我们配置的过滤器。获取到NamedFilterList后在将过滤器加入其中,这样过滤路径和过滤器映射关系就初始化好了。
至此,createInstance()方法中的createFilterChainManager()方法才算执行完成,它返回了一个FilterChainManager实例。之后再将这个FilterChainManager注入PathMatchingFilterChainResolver中,它是一个过滤器执行链解析器。
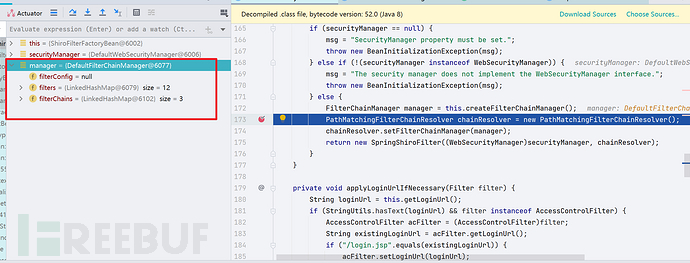
回到createInstance()方法下,跟进new PathMatchingFilterChainResolver(),这里需要提前在getChain()方法处下一个断点
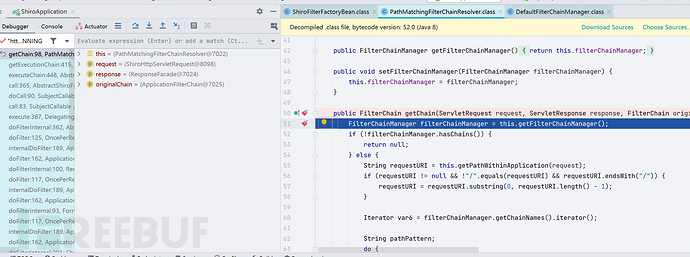
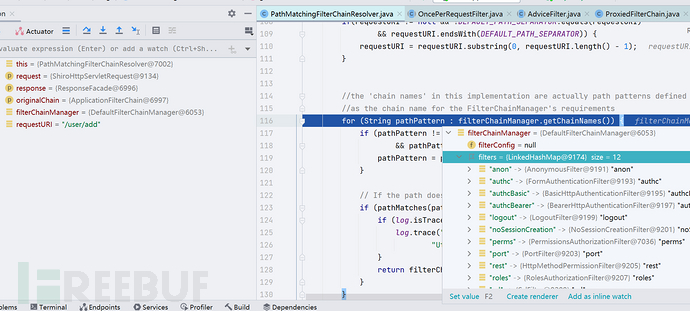
看到形参中ServletRequest和ServletResponse这两个参数,我们每次请求服务器都会调用这个方法,根据请求的 URL 去匹配过滤器执行链中的过滤路径,匹配上了就返回其对应的过滤器进行过滤。
这个方法中的filterChainManager.getChainNames()返回的是根据我们的配置配置生成的执行链的过滤路径集合,执行链生成的顺序跟我们的配置的顺序相同。从前文中我们也提到,在DefaultFilterChainManager的构造方法中将filterChains初始化为一个LinkedHashMap。如果第一个匹配的过滤路径就是/**那后面的过滤器永远也匹配不上。
过滤实现
-
如果之前分析过 Tomcat 的流程,这个过滤实现其实相当好理解
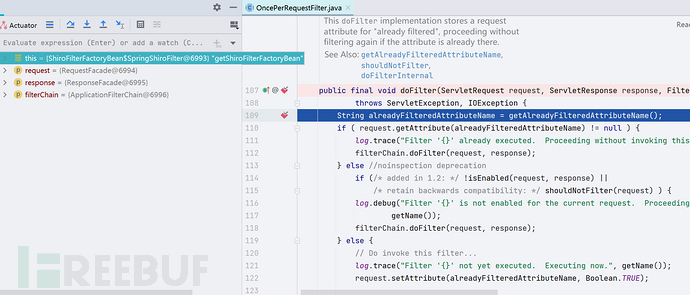
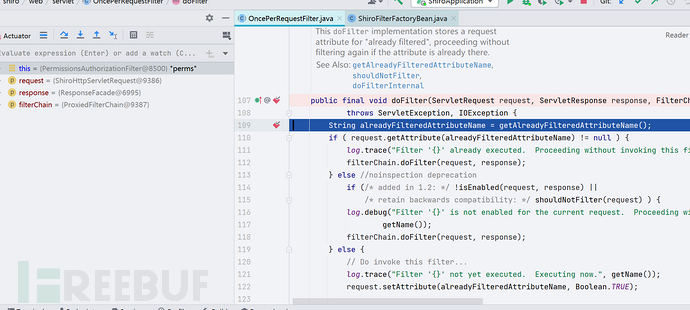
Tomcat 在收到请求之后,会进行一系列的doFilter()的链式操作,因为这里用到了 shiro 组件,那么 shiro 的某个 Filter 肯定也会被调用进这个 filterChain 当中,OncePerRequestFilter就是众多 Filter 中的一个。它所实现的doFilter()方法调用了自身的抽象方法doFilterInternal(),这个方法在它的子类AbstractShiroFilter中被实现了。
而OncePerRequestFilter通过一步步调用,最终调用到了上文提到的PathMatchingFilterChainResolver.getChain()方法,这一段流程和 Tomcat 实际上差别不大,我这里仅放出调用栈,不作过多的代码跟进。
getChain:98, PathMatchingFilterChainResolver (org.apache.shiro.web.filter.mgt)
getExecutionChain:415, AbstractShiroFilter (org.apache.shiro.web.servlet)
executeChain:448, AbstractShiroFilter (org.apache.shiro.web.servlet)
call:365, AbstractShiroFilter$1 (org.apache.shiro.web.servlet)
doCall:90, SubjectCallable (org.apache.shiro.subject.support)
call:83, SubjectCallable (org.apache.shiro.subject.support)
execute:387, DelegatingSubject (org.apache.shiro.subject.support)
doFilterInternal:362, AbstractShiroFilter (org.apache.shiro.web.servlet)
doFilter:125, OncePerRequestFilter (org.apache.shiro.web.servlet)
internalDoFilter:189, ApplicationFilterChain (org.apache.catalina.core)
我们去到OncePerRequestFilter类的doFilter()方法处下个断点,在成功登录并具有perms:add权限后,访问。一开始加载的是SpringShiroFilter这个类,它是 shiro 与 spring 程序进行整合的默认 Filter,每一个请求都会经过这个 Filter。
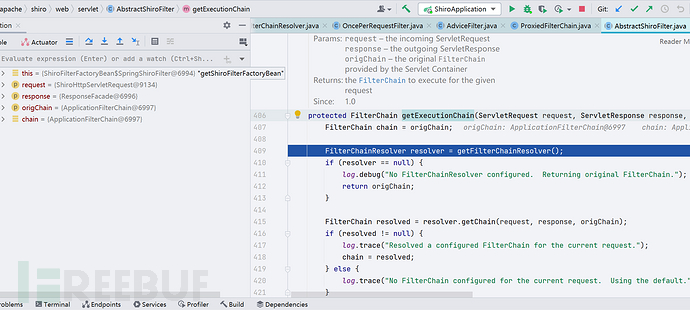
第一段的请求如上面调用栈所示,会最终去到PathMatchingFilterChainResolver.getChain()
通过getFilterChainResolver()就拿到了上面提到的过滤器执行链解析器PathMatchingFilterChainResolver,然后再调用它的getChain()匹配获取过滤器,最终过滤器在executeChain()中被执行。
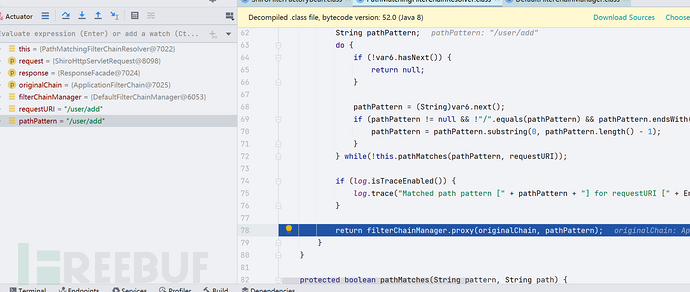
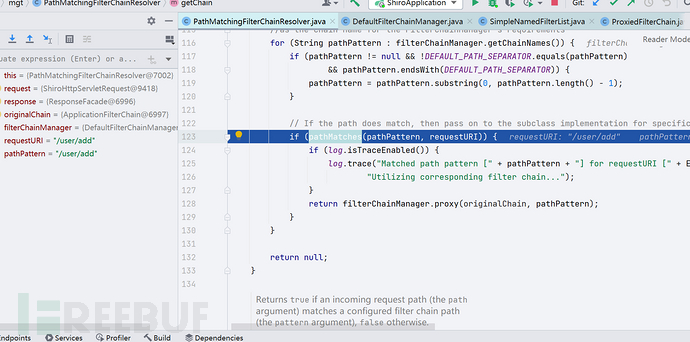
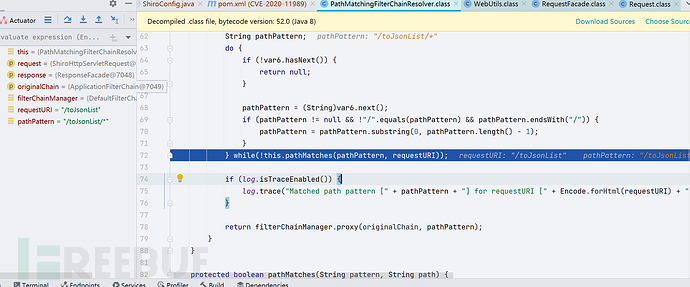
PathMatchingFilterChainResolver.getChain()将过滤路径与过滤规则拿出去,具体的业务在pathMatches()下
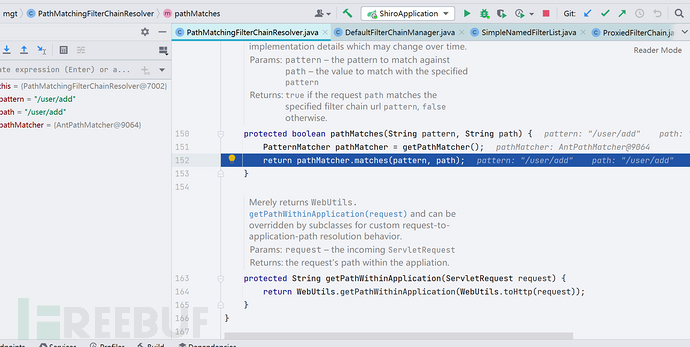
跟进pathMatcher.matches()方法
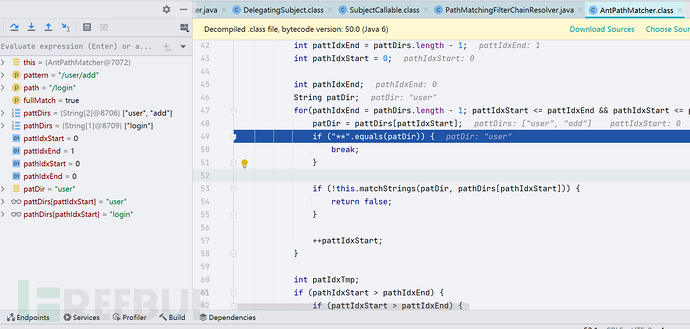
一通跟进,到了org.apache.shiro.util.AntPathMatcher#doMatch()方法,这个方法说来很玄乎啊,因为之前从ShiroConfig.java里面获取过所有的 url 路径,这个路径其实和对应的鉴权规则是一个键值对,所以在获取路径的时候同时也把鉴权规则获取了,只要判断当前路径与所有路径当中的某个匹配,就可以拿到那个路径对应的鉴权规则。
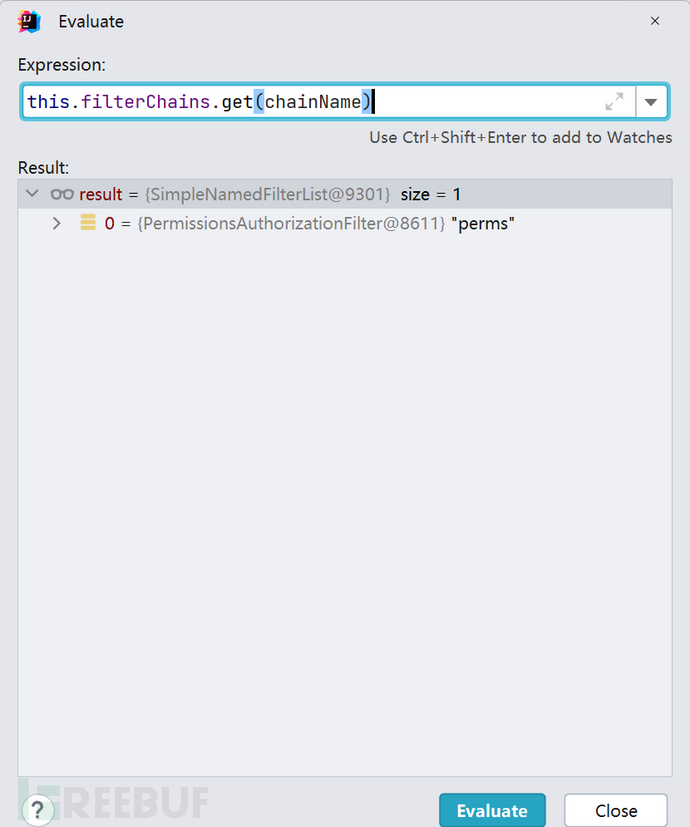
比如这里已经判断路径相同了,跟进filterChainManager.proxy(),跟进getChain(chianName)方法,这一步把鉴权规则赋值给 configured 变量。
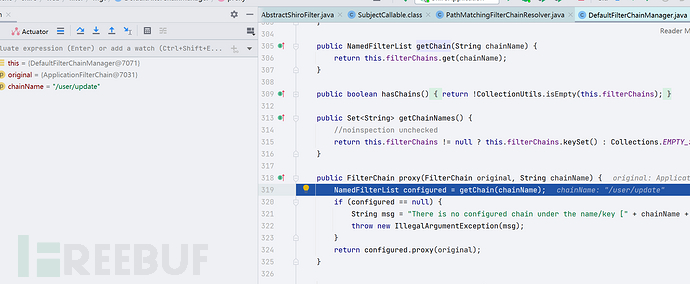
这里用枚举列出了所有 Shiro 内置过滤器的实例。(虽然具体流程找了很多资料,包括自己分析,没看到是哪里去匹配的,后续空了再看看吧)
public enum DefaultFilter {
    anon(AnonymousFilter.class),
    authc(FormAuthenticationFilter.class),
    authcBasic(BasicHttpAuthenticationFilter.class),
    logout(LogoutFilter.class),
    noSessionCreation(NoSessionCreationFilter.class),
    perms(PermissionsAuthorizationFilter.class),
    port(PortFilter.class),
    rest(HttpMethodPermissionFilter.class),
    roles(RolesAuthorizationFilter.class),
    ssl(SslFilter.class),
    user(UserFilter.class);
}
这里我们的权限是perms:add,对应的过滤器是org.apache.shiro.web.filter.authz.PermissionsAuthorizationFilter,所以在SpringShiroFilter对请求处理完毕之后,就会用PermissionsAuthorizationFilter来处理请求。如图,这也是第二次请求
往下,调用了doFilterInternal()方法,跟进
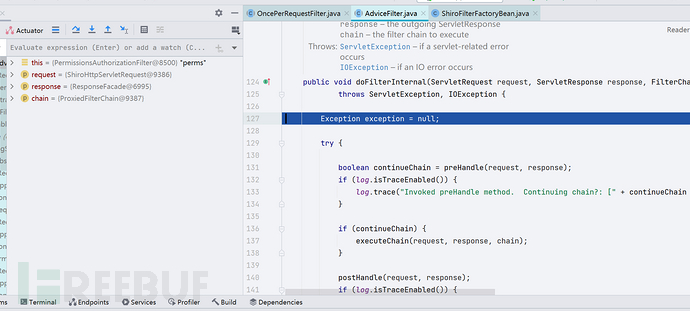
关于continueChain这里调用了preHandle()方法来判断这个请求是否合理,可以跟进去看一下代码逻辑,比较简单。
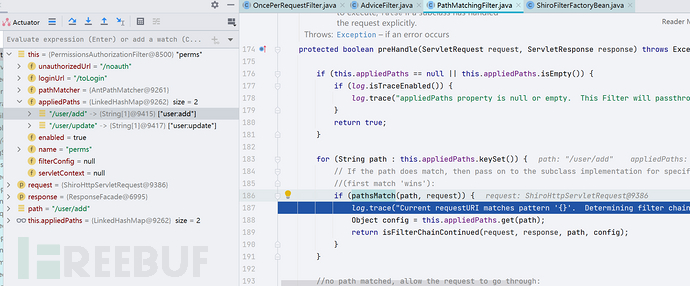
简单来说就是将this.appliedPaths,也就是我们之前在 ShiroConfig 里面定义要进行处理的 url,shiro 会判断目前请求的 url 与设置的是否相同(经过循环);如果相同则返回 true,继续进行对应的权限 Filter 处理。如果不同则跳出,直接将请求完成。
回到doFilterInternal()方法下,判断continueChain是否为 true,如果为 true 则执行executeChain()方法,跟进。
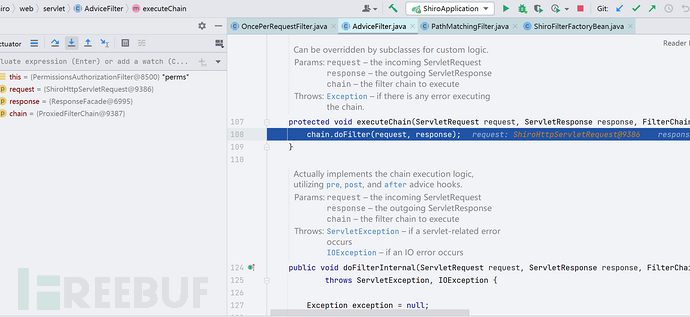
继续跟进doFilter()方法,判断了this.filters是否为空,如果不,则继续调用this.orig.doFilter()方法
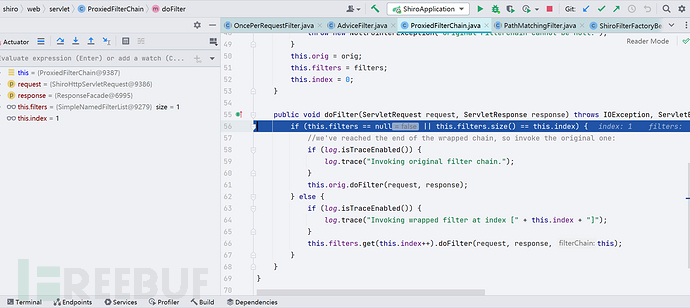
跟进,会发现进到了ApplicationFilterChain类的doFilter()方法,后面的请求都是由 Tomcat 来完成的
0x03 CVE-2010-3863
漏洞详情
Shiro 在路径控制的时候,未能对传入的 url 编码进行 decode 解码,导致攻击者可以绕过过滤器,访问被过滤的路径。
漏洞影响版本
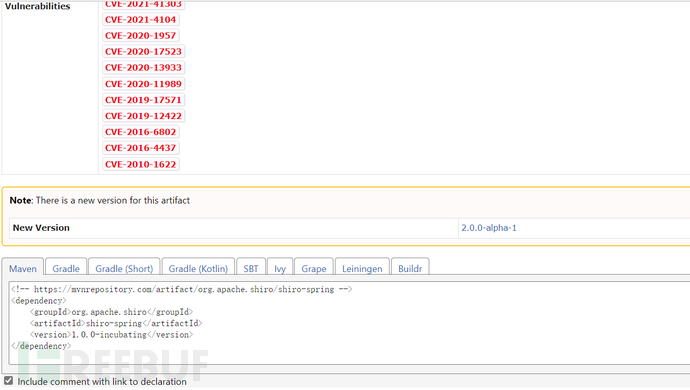
Shiro 1.0.0-incubating
对应 Maven Repo 里面也有
环境搭建
这个比 Shiro550、Shiro721 要增加一些东西,首先看 pom.xml 这个配置文件,因为漏洞是 shiro 1.0.0 版本的
<dependency>
    <groupId>org.apache.shiro</groupId>
    <artifactId>shiro-core</artifactId>
    <version>1.0.0-incubating</version>
</dependency>
<dependency>
    <groupId>org.apache.shiro</groupId>
    <artifactId>shiro-web</artifactId>
    <version>1.0.0-incubating</version>
</dependency>
<dependency>
    <groupId>org.apache.shiro</groupId>
    <artifactId>shiro-spring</artifactId>
    <version>1.0.0-incubating</version>
</dependency>
调整 ShiroConfig.java,增加代码如下
filterMap.put("/user/add","perms[user:add]");
filterMap.put("/user/update","perms[user:update]");
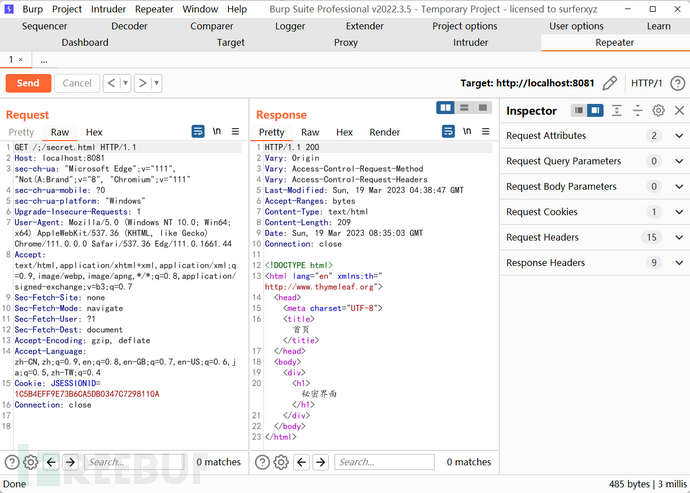
filterMap.put("/secret.html","authc,roles[admin]");
filterMap.put("/user/*", "authc");
filterMap.put("/**","anon")
HTML 文件 ———— static/secret.html
<!DOCTYPE html>
<html lang="en" xmlns:th="http://www.thymeleaf.org">
<head>
    <meta charset="UTF-8">
    <title>首页</title>
</head>
<body>
<div>
    <h1>秘密界面</h1>
</div>
</body>
</html>
这时候访问secret.html会得到一个 302 的重定向
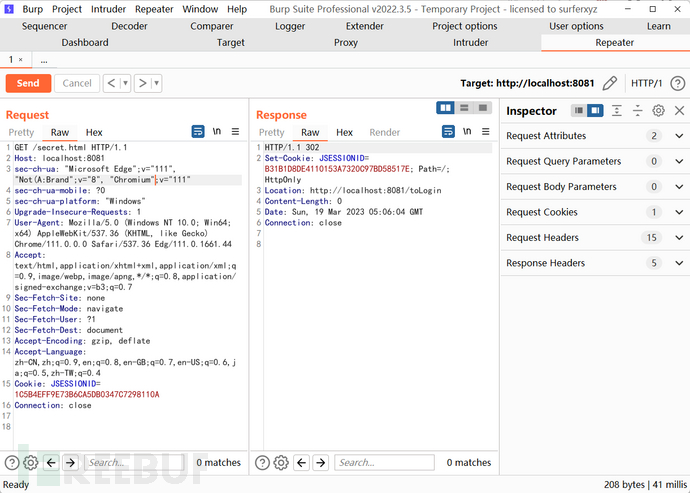
用 PoC 打能够打通

-
至此环境搭建完毕,当然搭建环境的时候可能会遇到如下这个报错
unable to correctly extract the initialization vector or ciphertext.
这个问题的解决方法是清除浏览器缓存即可。
漏洞复现与分析
先说 PoC,未标准化路径造成/./越权访问

把断点下在org.apache.shiro.web.filter.mgt.PathMatchingFilterChainResolver#getChain()处,开始调试
getChain()方法会先将所有的 URI 保存到变量名为i$的迭代器当中,然后逐一循环,进行pathMatches()的匹配。在循环两次之后,我们来看处理/./secret.html的代码。跟进pathMatches()方法
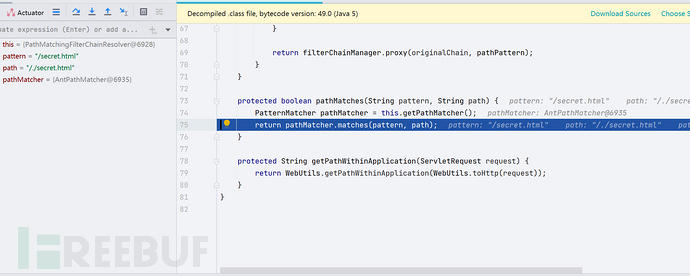
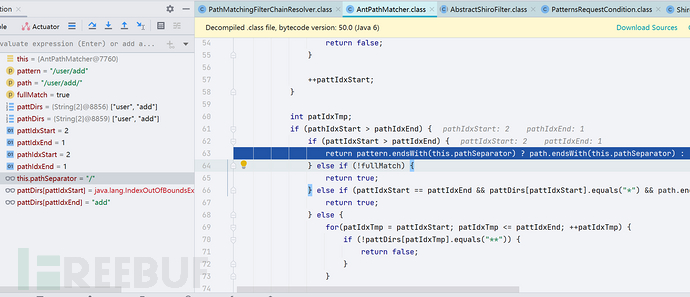
跟进pathMatcher.matches(),再跟进,最终是来到org.apache.shiro.util.AntPathMatcher#doMatch(),这个方法做了具体的实现业务。
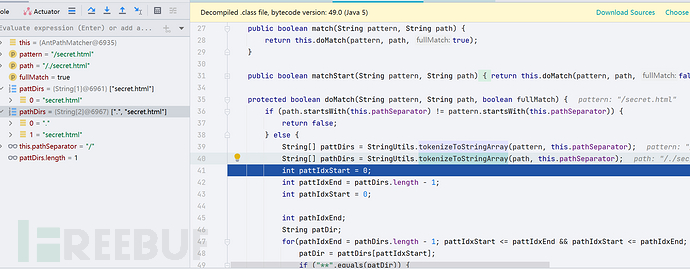
首先判断目前请求的 URL 开头与目标 URL 的开头是否都为/,如果不是则return false;往下,调用了StringUtils.tokenizeToStringArray()方法,之前的/secret.html转化成了["secret.html"]这个数组,/./secret.html转换成了[".","secret.html"]
继续往下,判断了patDir中是否存在**字符,如果存在就break;继续往下走,判断 html 的目录与当前请求的目录是否相同,因为我们请求被拆分出来是[".","secret.html"],.和secret.html不相同,所以会返回 false
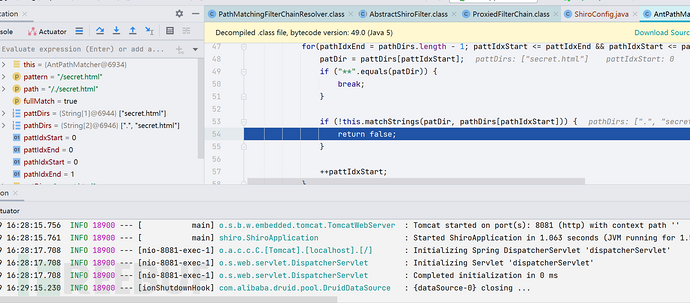
由于其不能与我们之前定的所有 URL 匹配,导致进入了 /**的匹配范围,这里之前我们设定的访问方式是/**,anon无需认证即可访问,由此造成越权
基于这个逻辑,/;/secret.html的 bypass 方式也是合理的,可能一些其他特殊字符也是可以的,前提是对请求并不造成影响,像..,#这类字符就会产生问题。
报错字符报错信息如下
Invalid character found in the request target [/\/secret.html ]. The valid characters are defined in RFC 7230 and RFC 3986
漏洞分析至此结束
漏洞修复
Shiro在 Commit更新中添加了标准化路径函数。
对 /、//、/./、/../等进行了处理。
0x04 CVE-2014-0074(shiro460)
漏洞详情
当程序使 用LDAP服务器并启用非身份验证绑定时,远程攻击者可借助空的用户名或密码利用该漏洞绕过身份验证。
漏洞影响版本
Shiro < 1.2.3
漏洞分析
这里我没有复现这个洞,有兴趣的师傅可以看一下 su18 师傅的复现文章,这个洞本质上来说是配置文件的冲突。
https://su18.org/post/shiro-1/#cve-2014-0074
0x05 CVE-2016-6802
漏洞详情
Shiro未对ContextPath做路径标准化导致权限绕过
漏洞影响版本
Shiro < 1.3.2
环境搭建
-
一开始还是用的之前的环境,最终复现的时候出了问题,最后查了不少的资源终于发现。。。。其实是因为我的项目包还是 SpringBoot 包,但其实这个洞是 Servlet Context Path 的问题,所以导致一直打不通。
最终借用了一个 Servlet Shiro 的项目包,代码在此处 https://github.com/Drun1baby/JavaSecurityLearning/tree/main/JavaSecurity/Shiro/CVE-2016-6802
漏洞复现与分析
按照网上的 payload 复现
-
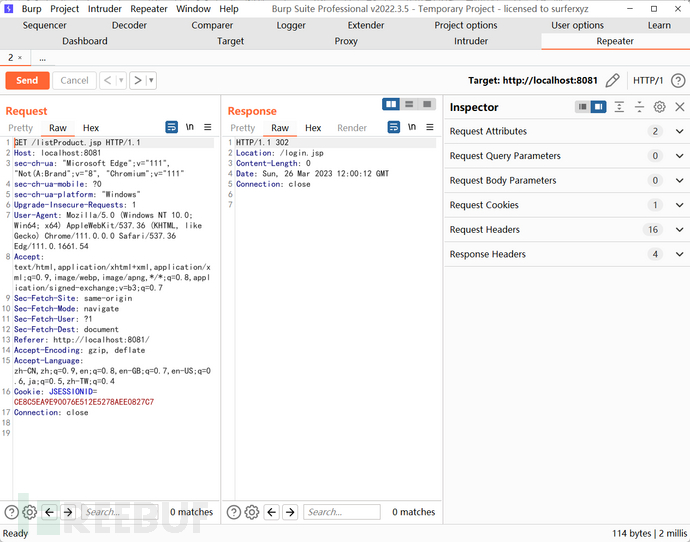
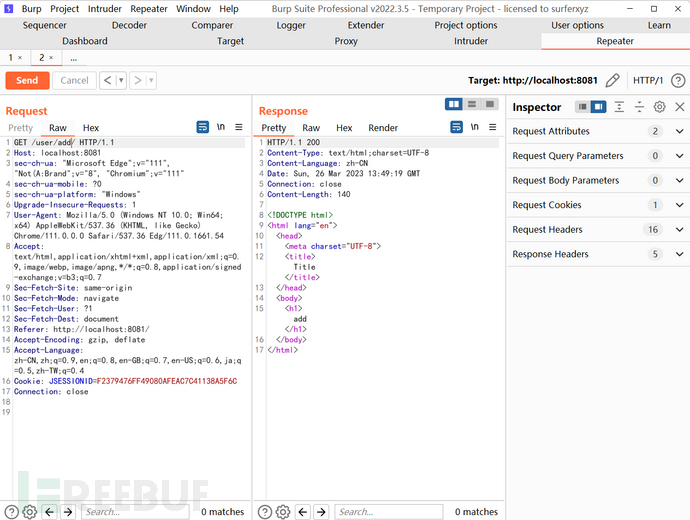
漏洞复现
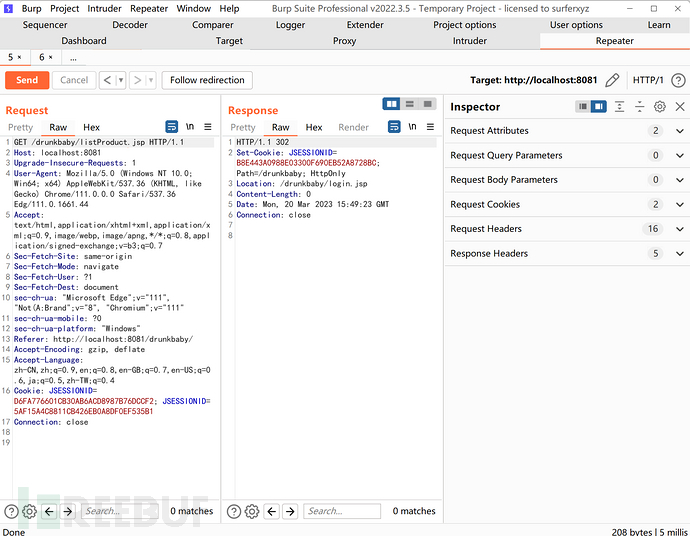
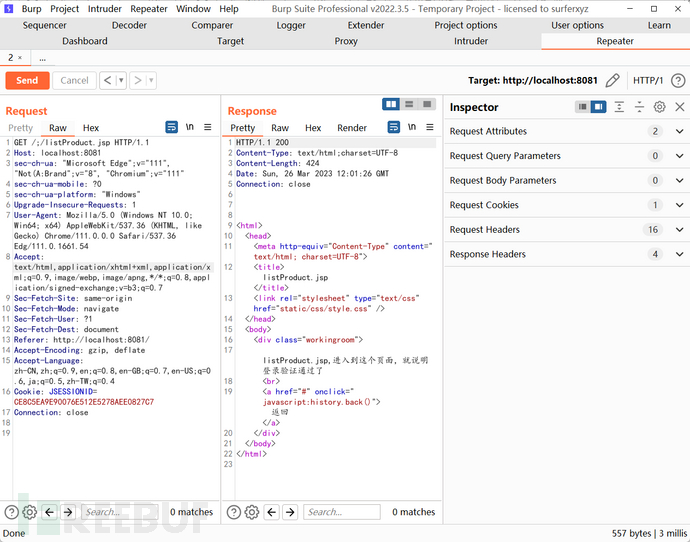
访问/drunkbaby/listProduct.jsp回显 302。
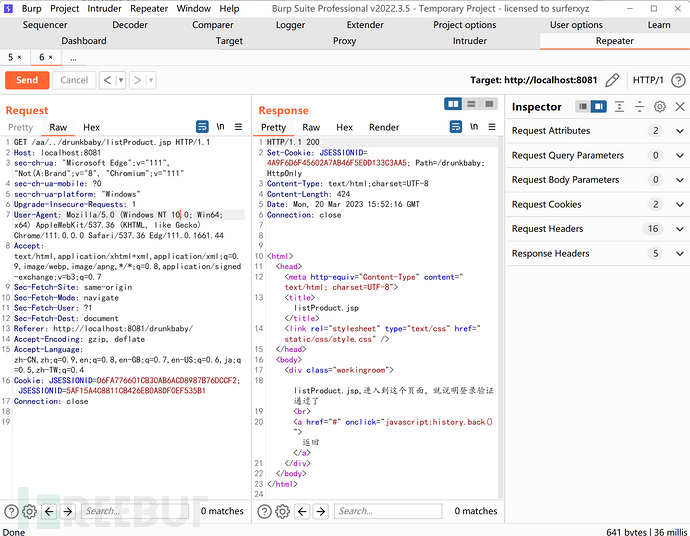
尝试 payload bypass/aa/../drunkbaby/listProduct.jsp,成功 200,造成越权。
漏洞分析
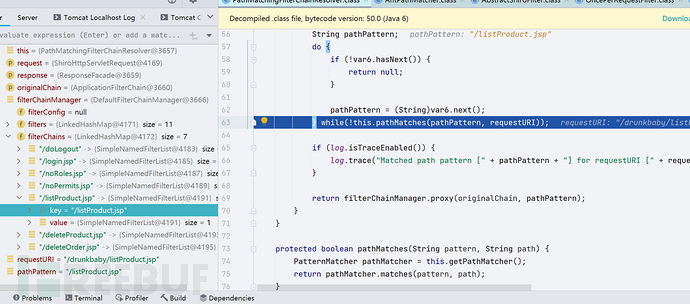
同样断点下在org.apache.shiro.web.filter.mgt.PathMatchingFilterChainResolver#getChain(),不同的是,这一次的分析我们不直接分析/aa/../drunkbaby/listProduct.jsp,而是从白盒的角度看漏洞原因,有一个自己真正分析漏洞的过程。
和前面的流程一样,同样是把所有的 URI 先放到迭代器里面,接着进行pathMatches()方法的处理,一路跟进到org.apache.shiro.util.AntPathMatcher#doMatch(),这里和之前也是一样的。
后来发现这里和 Shiro 1.0.0 的地方代码处理是一样的,感到很疑惑,那为啥不能用 Shiro 1.0 的 payload 直接打呢… 经过测试果然成功了?!算是自己独立发现的一点 bypass
-
但其实这个洞和我自己认为的 payload
/./与/;/是两种的攻击方式,因为当时只是用/drunkbaby/listProduct.jsp探测的,所以没发现问题。
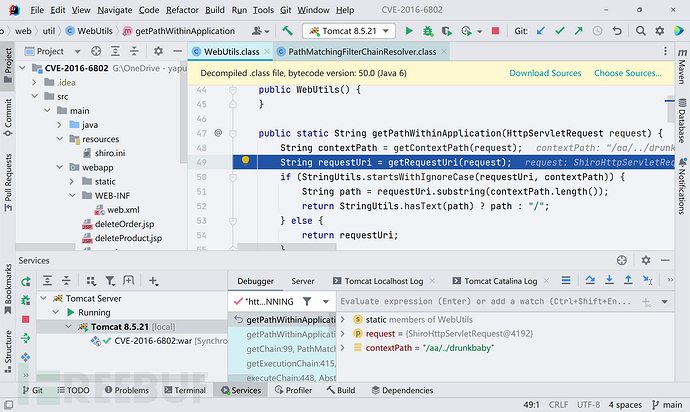
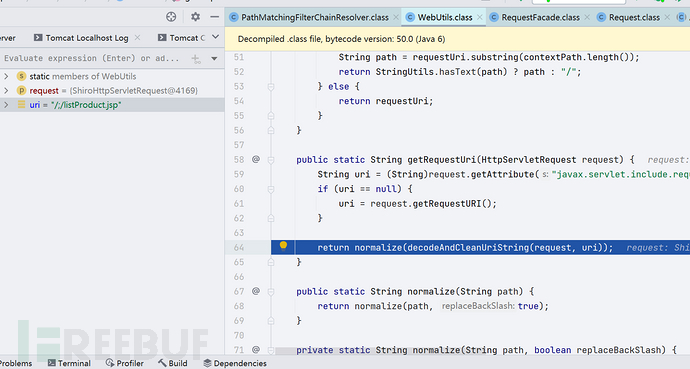
按照漏洞描述,是context_path存在的 bypass,所以我们应该是在org.apache.shiro.web.filter.mgt.PathMatchingFilterChainResolver#getChain()的第 53 行跟进getPathWithinApplication(),用的 PoC 是/aa/../drunkbaby/listProduct.jsp
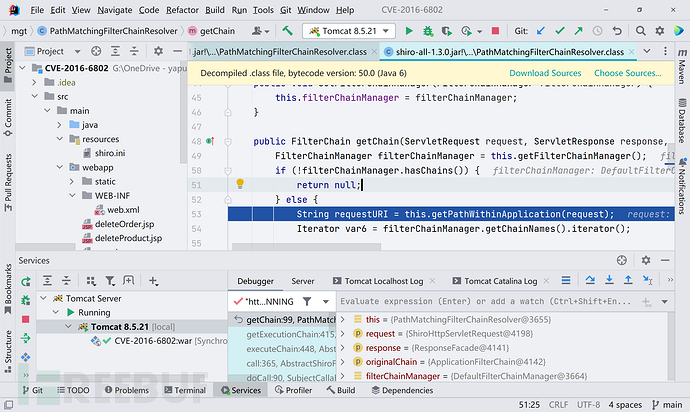
跟进至org.apache.shiro.web.util.WebUtils#getPathWithinApplication()方法,这时候我们请求的 url 还是/aa/../drunkbaby/listProduct.jsp,且 context path 为/aa/../drunkbaby
跟进getContextPath()方法,一路跟进
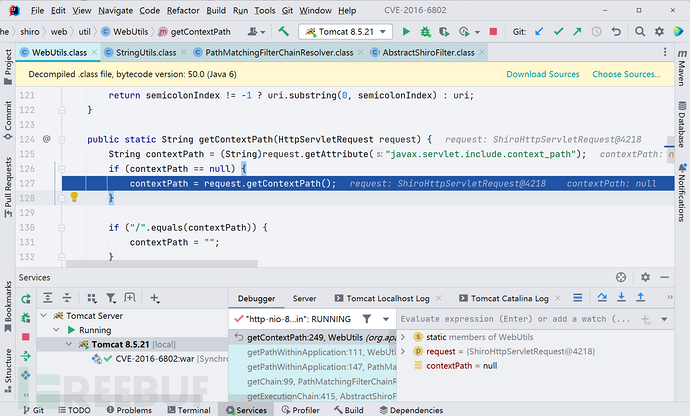
最后是到了org.apache.catalina.connector.Request#getContextPath()方法,这里的关键点是lashSlash变量

lashSlash为 1,进入到 else 里面的判断逻辑。往下是for的循环,其中定义了 pos 变量,pos 变量是由this.nextSlash()方法得到的,跟进nextSlash()方法可以很简单的看出来这个方法就是以/进行截断,返回值是/前面的长度。而后面的condidate变量是去截取 url 里面的/内容
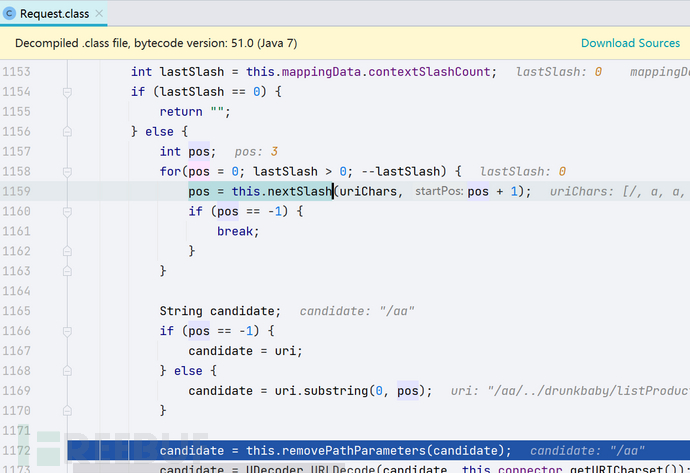
往下走到下一个循环里面,这里先判断contextPath和candidate是否相同,如果不相同的话,会一直往下取 url,直到相同为止。比如这里我们先获取到的 candidate 其实是/aa,它和contextPath ———— /drunkbaby不同,所以会继续往下取,往下取的 candidate 是/..,还是不相同,直到取到相同为止。
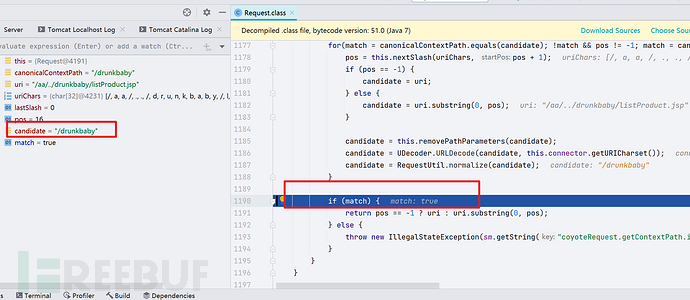
等到目前的 candidate 和 contextPath 相同之后,将后面的一段取出来。最后返回的是/aa/../drunkbaby。而/aa/../drunkbaby与/drunkbaby并不相同,这就导致不会走进到String path = requestUri.substring(contextPath.length());的逻辑
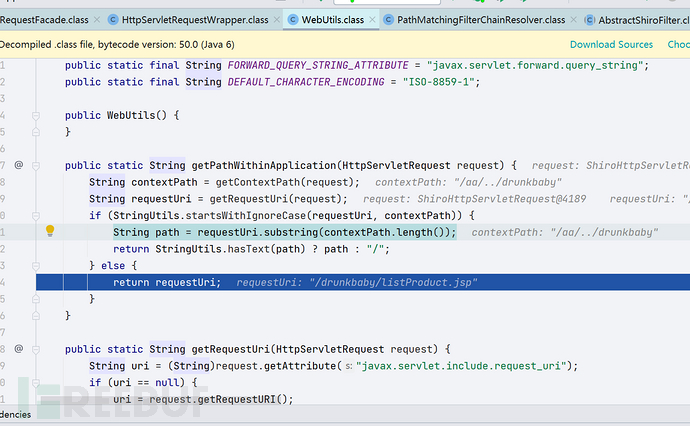
这一段关于 contextPath 的处理与分析结束了,后续是去处理 requestUri 的,现在 requestUri 的值为/drunkbaby/listProduct.jsp,我们的 shiro 鉴权仅限于是/listProduct.jsp的鉴权,所以说这一个请求其实根本就没有经过 shiro 了,那么它最后就变成了一个正常的请求,请求了 ————/drunkbaby/listProduct.jsp,无需鉴权。(后面发现这个调用过程似乎不是这么简单)
所以说这个洞本质上来说是因为 ContextPath 和 RequestURI 处理不一致。如果我修复的话肯定会对 ContextPath 下手。
自己发现的 bypass 的分析,同时不带 contextPath
先说说最开始发现这一种 bypass 的时候,也就是
在实际漏洞利用阶段,我发现/;/drunkbaby/listProduct.jsp也可以绕过鉴权。且发现不需要 contextPath 也可以进行 bypass,其实这里我认为就是因为在 CVE-2010-3863 当中,Shiro 并未修复/;/的 bypass,而是只是简单修复了/./,/../的绕过鉴权方式,后续发现最新版本当中已经修完了这个洞,并且 Shiro<=1.3.1 的版本漏洞并不做处理。
-
这里感觉上也差不多,对于
contextPath这一块的处理时返回的 url 为/
最后这里会去找request.getServletPath(),这里的值实际上就是正常请求的值
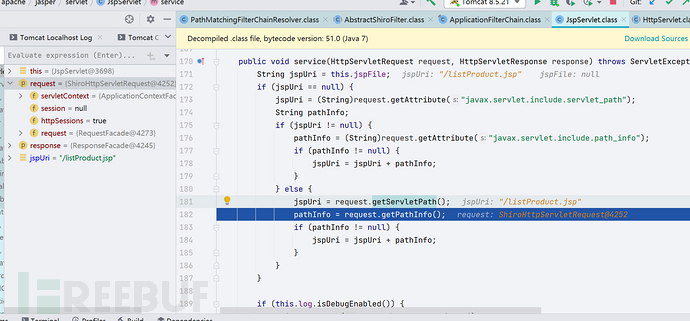
由此我们的请求才是完成,不论是/aa/../还是简单的/;/都可以直接让requestUri返回错误的结果,从而导致这个结果不会被 shiro 鉴权模式匹配。
讲完了最开始的 bypass 发现与分析,这里我们把不带 contextPath 也分析一下
-
先放个 PoC
开始调试,直接看org.apache.shiro.web.util.WebUtils#getPathWithinApplication()方法,之前的漏洞里面因为是 contextPath 的解析问题,所以跟进了getContextPath()方法。此时,uri 为 null,所以会将全部的请求 uri 拿进来,也就是/;/listProduct.jsp
先跟进decodeAndCleanUriString()方法,indexOf(59)也就是第一次出现;的位置,返回为 1,所以最后截取的 uri 也就是/
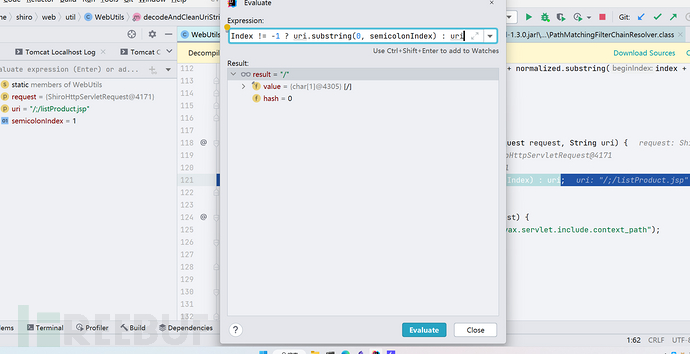
跟进normalize(),这个方法其实是 CVE-2010-3863 这个洞的修复手段。说白了就是过滤了/./,/../以及//,这里我们的 uri 是/,是不会有任何过滤的。

回到WebUtils类当中,因为目前 contextPath 为空,所以直接走到startsWithIgnoreCase()方法判断后为 true 的逻辑当中。
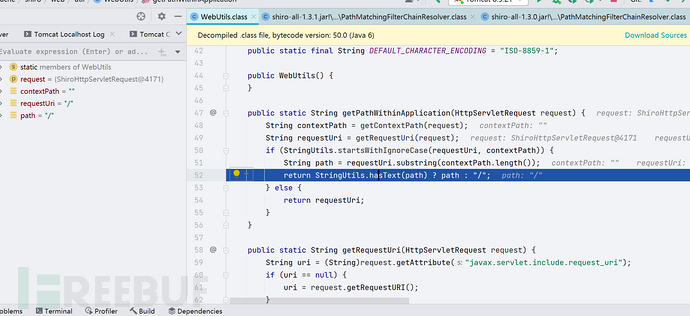
同理,最后既然返回的是/这个 url,不属于是 shiro 鉴权的 uri,所以会去加载后面的getServletPath
漏洞修复
Shiro 官方修复如链接 Commit
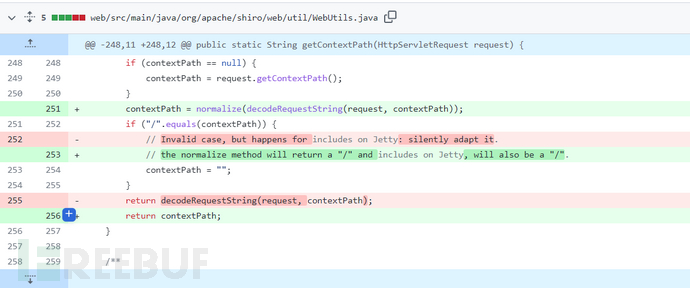
先做了normalize(decodeRequestString())的过滤,这里其实并没有解决/;/的 bypass,只是解决了最原始的 payload/aa/../
我们可以思考一下,根据上面的代码逻辑,这里如果存在 contextPath,前面带有/;/,最终拿到的 contextPath 是为空的,如此一来,就还是会走到 contextPath 为空的逻辑里面,也就是我上面分析的那一段。
-
当然经测试,shiro 最新版本,也就是 1.11.0 版本当中,并不存在这一 bypass(要不然就是 0day 了哈哈,这么简单的洞也轮不到我发现
0x06 CVE-2020-1957 与 Shiro682
Shiro 权限绕过漏洞在 SpringBoot 高版本下的表现
整个环境我已搭建完毕
-
在看后续漏洞之前我觉得有必要在这个地方提一提 Shiro682 这个洞
关于 Shiro 682
漏洞详情
在 Spring 中,/drunkbaby/xx与/drunkbaby/xx/都会被处理成/drunkbaby/xx。
而在 Shiro 中,/drunkbaby/xx与/drunkbaby/xx/被视为不同的路径,所以在 Spring 集成 Shiro 时,只需要在访问路径后添加/就存在绕过权限校验的可能。
漏洞影响版本
Shiro < 1.5.0
环境搭建
环境同最开始 Shiro 流程分析的环境,修改一下 Shiro 版本即可。
漏洞复现与分析
Shiro682 的攻击方式
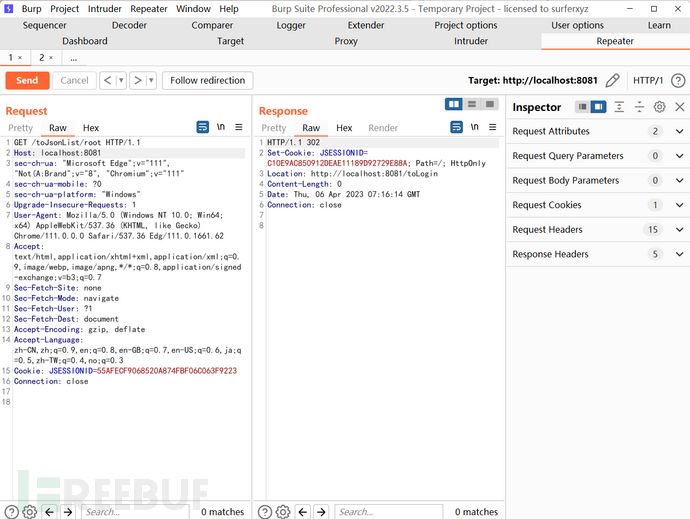
直接访问authc路径,302

修改 url,也就是在最后面加上/,成功 bypass
-
既然是个 Spring 和 Shiro 的解析差异,那么应该去 Shiro 的处理 uri 的地方和 Spring 处理 uri 的地方下两个断点进行调试。
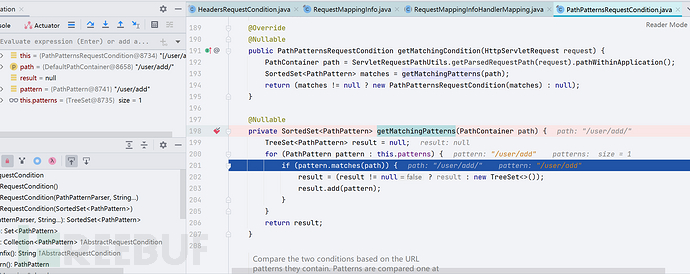
Shiro 的 uri 处理还是在org.apache.shiro.web.filter.mgt.PathMatchingFilterChainResolver#getChain(),spring 对于 uri 中结尾带/的处理是在这里org.springframework.web.servlet.mvc.condition.PatternsRequestCondition#getMatchingPatterns();这里先做 Shiro 的鉴权,再做 spring 的 uri 识别。
Shiro 的鉴权,不会把/user/add识别为/user/add/,如图
跟进pathMatches()方法,最终是返回 false
-
接着我们来看 Spring 的处理,spring 在分发请求时
org.springframework.web.servlet.DispatcherServlet#doDispatch,会根据我们请求的 URI 选择一个最合适的 handler,其实就是从DispatcherServlet#handlerMappings找到能匹配路径的 Handler
org.springframework.web.servlet.mvc.condition.PatternsRequestCondition#getMatchingPatterns()
整条调用栈如下
getMatchingPatterns:236, PatternsRequestCondition (org.springframework.web.servlet.mvc.condition)
getMatchingCondition:221, PatternsRequestCondition (org.springframework.web.servlet.mvc.condition)
getMatchingCondition:240, RequestMappingInfo (org.springframework.web.servlet.mvc.method)
getMatchingMapping:94, RequestMappingInfoHandlerMapping (org.springframework.web.servlet.mvc.method)
getMatchingMapping:58, RequestMappingInfoHandlerMapping (org.springframework.web.servlet.mvc.method)
addMatchingMappings:427, AbstractHandlerMethodMapping (org.springframework.web.servlet.handler)
lookupHandlerMethod:393, AbstractHandlerMethodMapping (org.springframework.web.servlet.handler)
getHandlerInternal:367, AbstractHandlerMethodMapping (org.springframework.web.servlet.handler)
getHandlerInternal:449, RequestMappingHandlerMapping (org.springframework.web.servlet.mvc.method.annotation)
getHandlerInternal:67, RequestMappingHandlerMapping (org.springframework.web.servlet.mvc.method.annotation)
getHandler:393, AbstractHandlerMapping (org.springframework.web.servlet.handler)
getHandler:1234, DispatcherServlet (org.springframework.web.servlet)
doDispatch:1016, DispatcherServlet (org.springframework.web.servlet)
这里其实就可以看到matches()的判断为 true
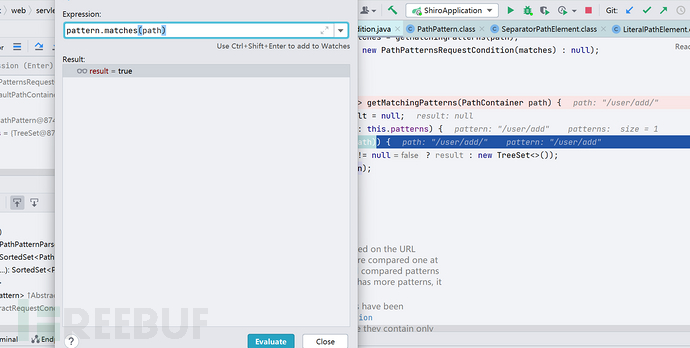
跟进matches(),最终这里判断的代码其实是org.springframework.web.servlet.handler.AbstractUrlHandlerMapping#match()方法

漏洞修复
Commit地址如链接,这是高版本用于修复 Shiro682 的补丁,本质上只是进行了尾部的/的处理,迁就了 Spring
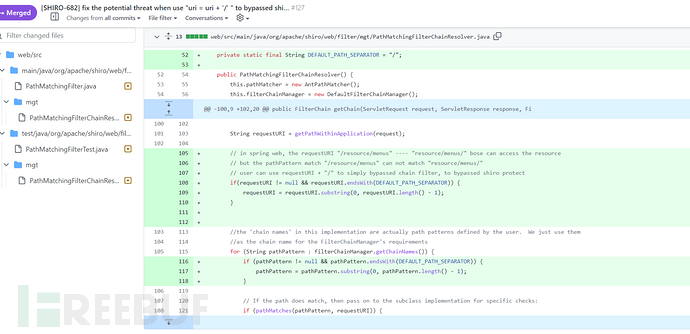
而关于 Shiro682 的处理,我们可以看到对于 Spring 不同版本实际上也有处理,但更为关键的是 Shiro 的处理。
关于 CVE-2020-1957 的漏洞
自己发现的一种 bypass,在高版本 SpringBoot 中可用
说是/user;/add的 bypass,虽然也有一种说法,说这一种攻击才是正统的 CVE payload(后面发现这是我自己乱搞出来的,笑死
从PathMatchingFilterChainResolver.getChain()下断点,跟进到this.getPathWithinApplication()方法,这里uri = request.getRequestURI();出来的 uri 还是我们原始请求的那一个,往下走,跟进normalize(decodeAndCleanUriString(request, uri)),这个方法之前我们提到过,会处理/../,/./这一系列的 uri
通过indexOf()截取到了;之前的内容,所以 uri 最后返回回来的值的为/user,那么后续自然而然,/user与/user/add肯定不匹配,返回 false
下面我们去看 Spring 是怎么处理请求的,其实当时看的参考文章和我的不太一样,这里算是踩坑了,不过还是自己分析吧,也是很快的 。
倒也不完全是,我发现这里很多文章写的 payload 都是/xxx/..;/user/add这一种的越权,实际测试下来发现这一种不行,有的文章里面说是因为 SpringBoot 版本太高了,既然如此,能够有这一种的方便 bypass,还是自己分析一下吧。后续会简单提一下之前的 payload 是怎么打的。
这里我先把断点下在了org.springframework.web.servlet.DispatcherServlet#doDispatch()方法处,因为这个方法是用来做 SpringBoot 的处理的,相当于是一个前端控制器。
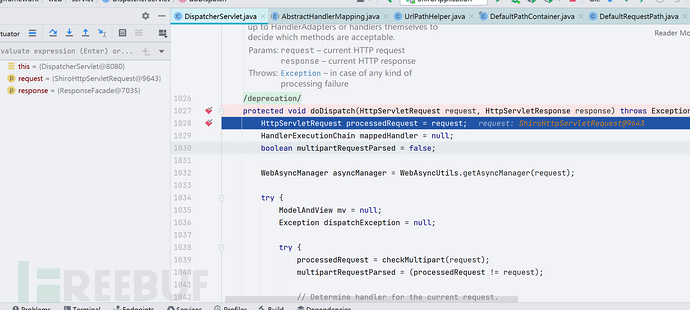
往下走,第 1043 行,DispatcherServlet类收到请求调用HandlerMapping处理器映射器。处理器映射器根据请求 url 找到具体的处理器,生成处理器对象 Handler 及处理器拦截器(如果有则生成)一并返回给DispatcherServlet。
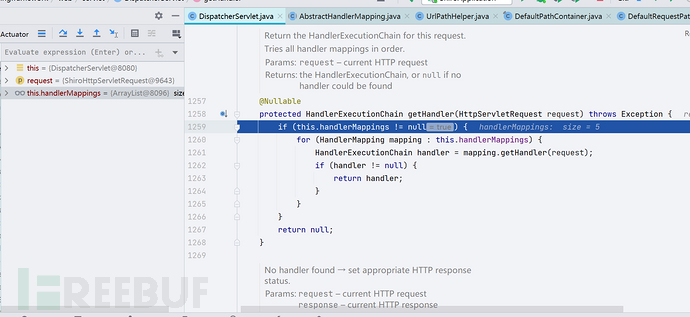
这里匹配到的第一个 ——RequestMappingHandlerMapping就是,我们跟进getHandler()方法看一下,一路跟进至org.springframework.web.servlet.handler.AbstractHandlerMethodMapping#getHandlerInternal方法,在这个方法里做了具体业务,当然这里我们继续跟进initLookupPath()方法。
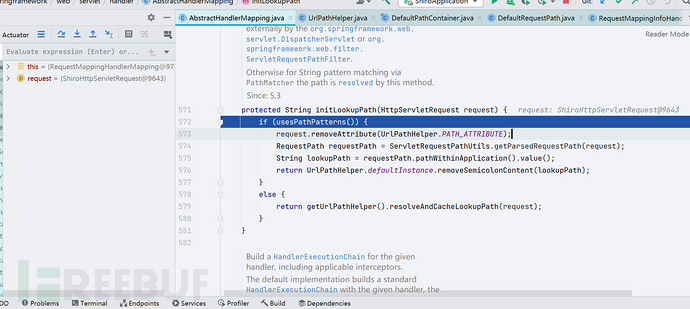
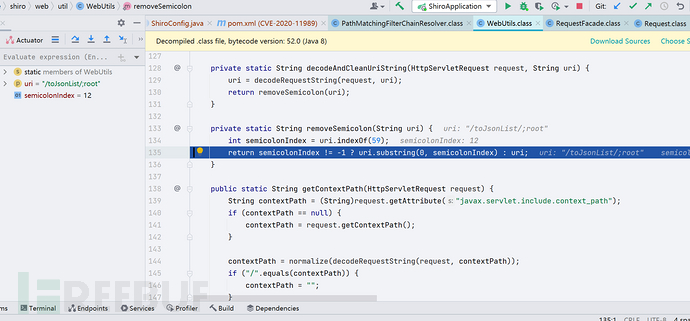
initLookupPath()方法主要是做了 Uri 处理的初始化,这个 Uri 变量最终还是要经过一些处理,继续跟进removeSemicolonContent()方法。removeSemicolonContent()方法的意思是判断是否需要删除分号内容,如果需要则跟进removeSemicolonContentInternal()方法,如果不需要的话就销毁此 session,将 Uri 返回,这一 Uri 就是正确的 Uri 了。
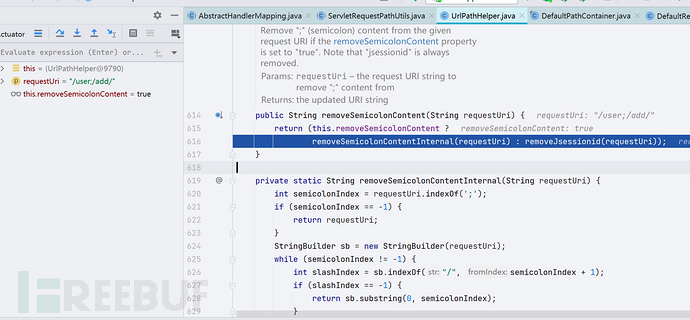
这里我们需要去除分号,所以跟进removeSemicolonContentInternal(requestUri)方法

后续就是老一套的 MVC 了,这里不再赘述。
顺带再提一提/xxx/..;/user/add这个 payload
-
这个 payload 是有要求的,要求 SpringBoot 的版本 < 2.3,是很多师傅文章里面的 payload
流程都是一样,DispatcherServlet类收到请求调用HandlerMapping处理器映射器。这里匹配到的是org.springframework.web.util.UrlPathHelper#getLookupPathForRequest
public String getLookupPathForRequest(HttpServletRequest request) {
        if (this.alwaysUseFullPath) {
            return this.getPathWithinApplication(request);
        } else {
            String rest = this.getPathWithinServletMapping(request);
            return !"".equals(rest) ? rest : this.getPathWithinApplication(request);
        }
    }
一整个调用栈如下
getRequestUri:326, UrlPathHelper (org.springframework.web.util)
getPathWithinApplication:244, UrlPathHelper (org.springframework.web.util)
getPathWithinServletMapping:195, UrlPathHelper (org.springframework.web.util)
getLookupPathForRequest:171, UrlPathHelper (org.springframework.web.util)
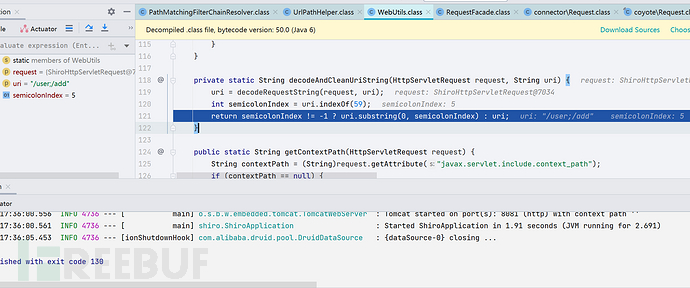
直接跟进decodeAndCleanUriString()方法,代码如下,其实这一段在 Y4tacker 师傅 CVE-2016-6802 分析的时候也出现过
private String decodeAndCleanUriString(HttpServletRequest request, String uri) {
        uri = this.removeSemicolonContent(uri);
        uri = this.decodeRequestString(request, uri);
        uri = this.getSanitizedPath(uri);
        return uri;
    }
跟进removeSemicolonContent()方法,主要问题是在这里
public String removeSemicolonContent(String requestUri) {
        return this.removeSemicolonContent ? this.removeSemicolonContentInternal(requestUri) : this.removeJsessionid(requestUri);
    }

    private String removeSemicolonContentInternal(String requestUri) {
        for(int semicolonIndex = requestUri.indexOf(59); semicolonIndex != -1; semicolonIndex = requestUri.indexOf(59, semicolonIndex)) {
            int slashIndex = requestUri.indexOf(47, semicolonIndex);
            String start = requestUri.substring(0, semicolonIndex);
            requestUri = slashIndex != -1 ? start + requestUri.substring(slashIndex) : start;
        }

        return requestUri;
    }
这里分别依次调用三个方法,分别用来过滤;、urldecode、过滤//,这就导致最后返回的其实就是/admin/index
漏洞修复
在 1.5.2 版本中对其进行了修复,获取 requestURI 的方式从request.getRequestUri直接获取的方式更改为获取 request 的 ContextPath,ServletPath,PathInfo,然后再重新拼接而成。
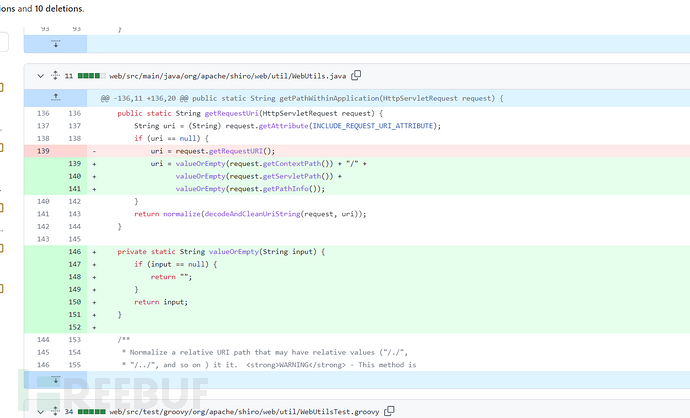
输入的/xxx/..;/user/add,将会被拼接为//xxx/user/add再进行 URI 路径匹配,则无法绕过拦截器。或者就返回 404,导致无法成功越权。
0x07 CVE-2020-11989/CVE-2020-13933
CVE-2020-11989
漏洞详情
此漏洞有两种绕过方式,一种是之前我们说的/;/user/add的绕过方式,且并不局限于 context-path,因为前面自己分析过了,就不再分析了。
另外一种绕过方式是关于双层编码绕过,这个场景下需要一些限制条件,首先配置文件的ant风格需要是*而不是**,测试发现,?也可以
另外controller需要接收的request参数 (@PathVariable) 的类型需要是String,否则将会出错。
漏洞影响版本
-
Apache Shiro < 1.5.3
环境搭建
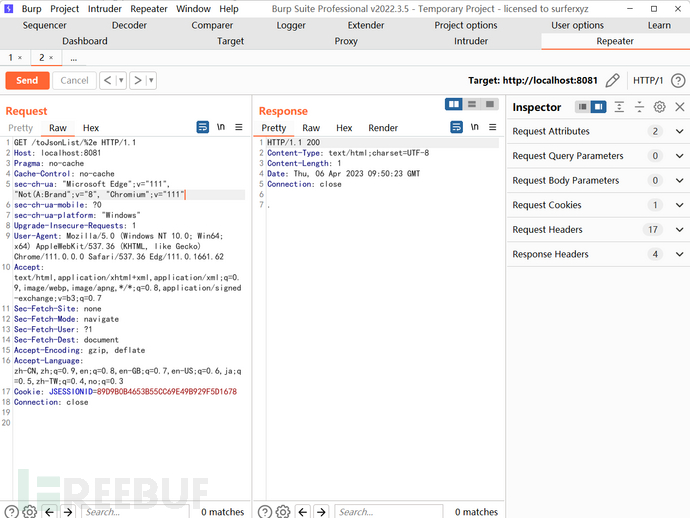
添加一个@PathVariable的接口
@ResponseBody
@GetMapping("/toJsonList/{name}")
public String namePage(@PathVariable String name){
    return name;
}
且添加 shiro 鉴权
filterMap.put("/toJsonList/*", "authc");
漏洞复现与分析
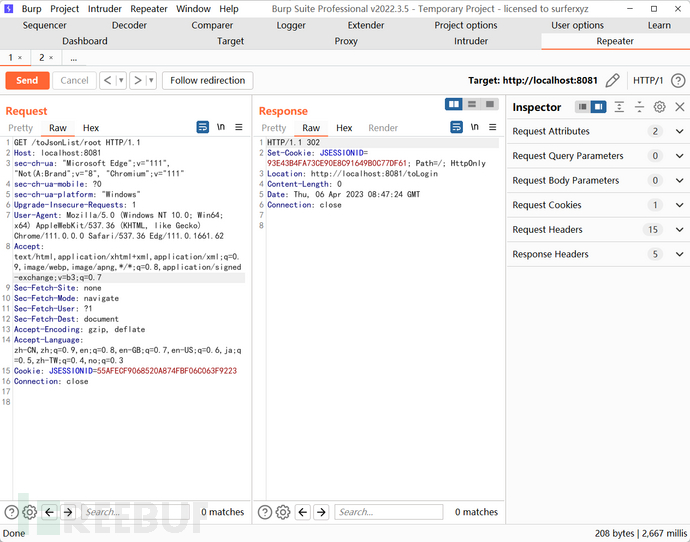
只有 Shiro 1.5.2 版本是可以的,其他版本使用都是 400,不知道是不是我自己环境搭建的问题。访问未授权路径 302
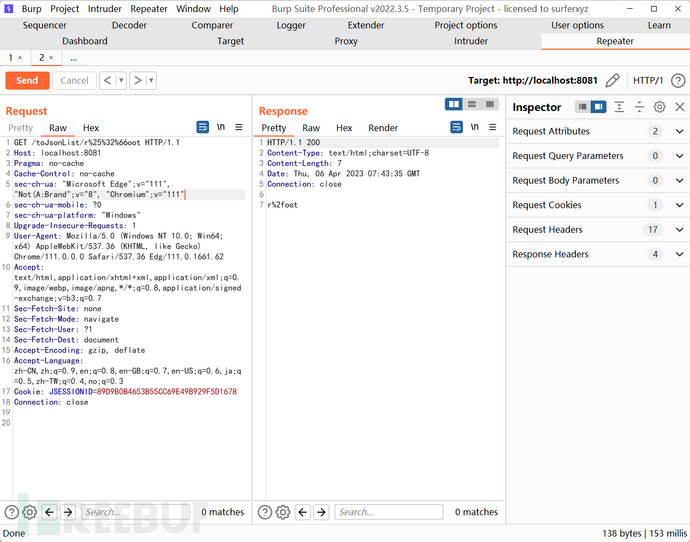
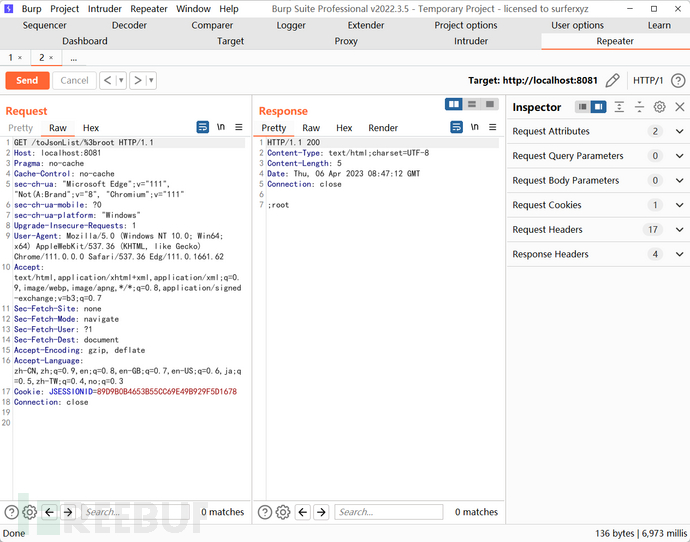
越权访问,payload/toJsonList/r%25%32%66oot,注意看。。。我当时这里被坑了
测试发现下面四种组合只有前两组可以绕过
yes
/toJsonList/a%25%32%66a
/toJsonList/%25%32%66

no
/toJsonList/%25%32%66a
/toJsonList/a%25%32%66
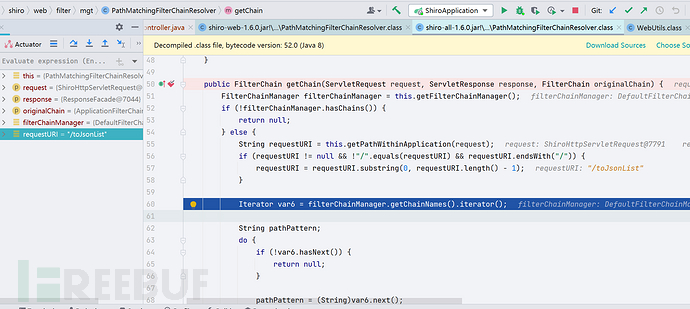
简单分析一下这个漏洞,因为还是老一套的断点 + 跟进,这里我就不再赘述了,直接讲最重要的部分org.apache.shiro.web.util.WebUtils#getRequestUri(),我们先看一下 request 里面的 url 是什么
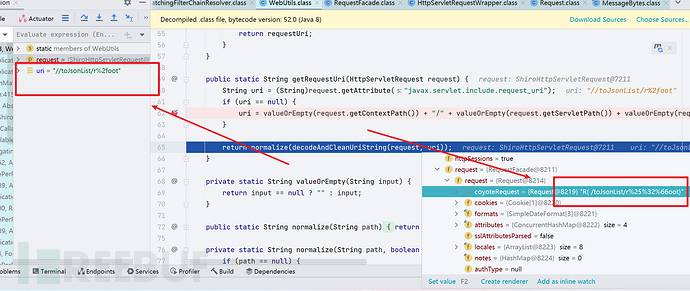
我们原本的输入先经过自动的 url 一次解码,decodeAndCleanUriString()方法是用来消除;的,所以没什么影响,最后拿到的 url 是/toJsonList/r/oot,那么这一个路径不是/toJsonList/*,而是/toJsonList/r/*,所以 shiro 鉴权变得无效了。
后续通过@PathVariable注解,却会自动拼接r%2foot,从而 200。
观感来来说这种 bypass 非常鸡肋,我暂时想不到有什么能够利用的角度
漏洞修复
Commit如链接所示
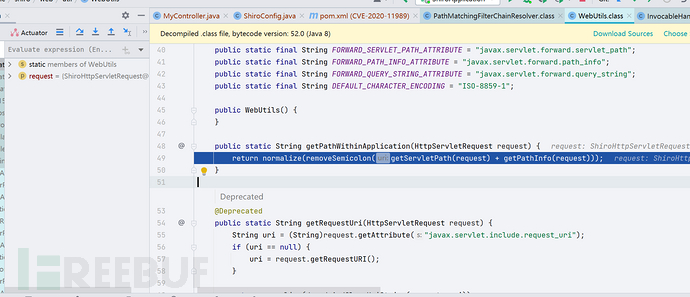
可以看到,shiro建议使用 getPathWithinApplication()方法获取路径减去上下文路径,或直接调用 HttpServletRequest.getRequestURI()方法获取。
在 WebUtils#getPathWithinApplication方法,修改了使用 RequestUri去除 ContextPath的方式,改为使用 getServletPath(request) + getPathInfo(request))。然后使用 removeSemicolon方法处理分号问题,normalize方法进行路径标准化。
而那一种 bypass,我觉得 Shiro 官方认为这是一种鸡肋的攻击方式,且利用条件比较苛刻,所以没有进行修复。
CVE-2020-13933
漏洞详情
其实就是上文讲的鸡肋 bypass 的一种 bypass,虽然从利用角度来说很鸡肋,但是能找到这个漏洞确实是厉害。
漏洞影响版本
影响版本 shiro < 1.6.0
漏洞复现与分析
payload 比较不一样,之前是二次的 url 编码,这次是/toJsonList/%3broot,访问未授权界面 302
通过 payload bypass
关键处是在org.apache.shiro.web.util.WebUtils#getPathWithinApplication()
removeSemicolon()方法会把分号给移除,我们跟进看一下,这里挺重要的
由于截取的是;所在的位置,这就导致返回的 url 其实是/toJsonList/,和 shiro 鉴权比较是 false 的
而在 spring 当中org.springframework.web.util.UrlPathHelper#decodeAndCleanUriString
这里流程是先去除;再解码,因此出现了问题
private String decodeAndCleanUriString(HttpServletRequest request, String uri) {
  uri = this.removeSemicolonContent(uri);
  uri = this.decodeRequestString(request, uri);
  uri = this.getSanitizedPath(uri);
  return uri;
}
漏洞修复
Commit漏洞修复如链接
shiro在1.6.0版本中,org.apache.shiro.spring.web#ShiroFilterFactoryBean中增加了/**的默认路径配置,使其可以全局匹配进行过滤校验。
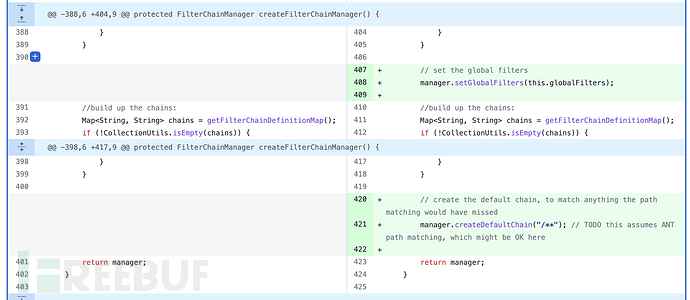
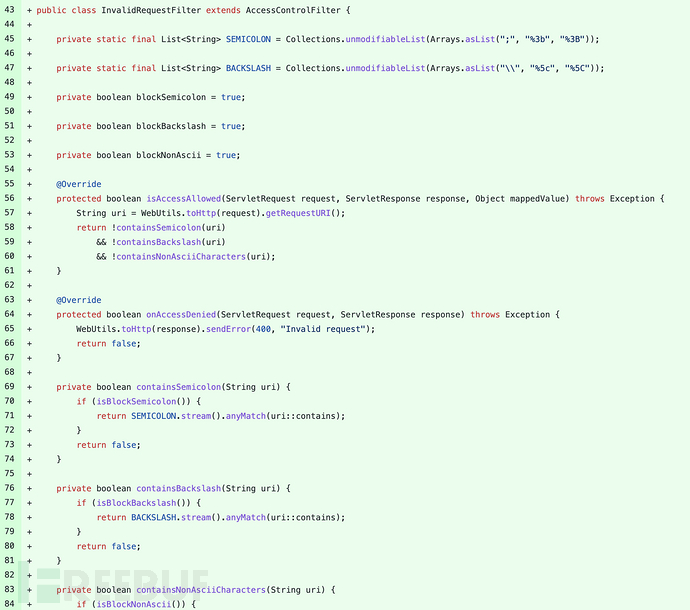
默认的/**配置对应一个全局的 filter:InvalidRequestFilter,这个类继承了 AccessControlFilter。用来过滤特殊字符(分号、反斜线、非ASCII码字符),并返回 400状态码。
0x08 CVE-2020-17510/CVE-2020-17523
CVE-2020-17510
漏洞详情
同样是 bypass,同之前两种的 bypass 不太一样,用的是.bypass
漏洞影响版本
Shiro < 1.7.0
漏洞复现与分析
同样是@PathVariable才能打通,payload 为/toJsonList/%2e,这个洞就更鸡肋了
我觉得这个洞更为鸡肋的一点就是,它和之前的洞不一样,之前的洞的 name 是可控的,这里完全只能是%2e,或者是其他 payload,但也仅限于此。
当Shiro获得的uri为/toJsonList时,是无法和/hello/*匹配的,所以就在/hello后面加上%2e,这样Shiro解码之后变成/hello/.,然后路径标准化成为/hello,绕过身份验证。
下面的payload都可以使用,但还是那个问题,局限性比较大
/%2e
/%2e/
/%2e%2e
/%2e%2e/
漏洞修复
在Commit中发现org.apache.shiro.spring.web下新增了ShiroUrlPathHelper类,属于UrlPathHelper的子类,重写了getPathWithinApplication和getPathWithinServletMapping两个方法
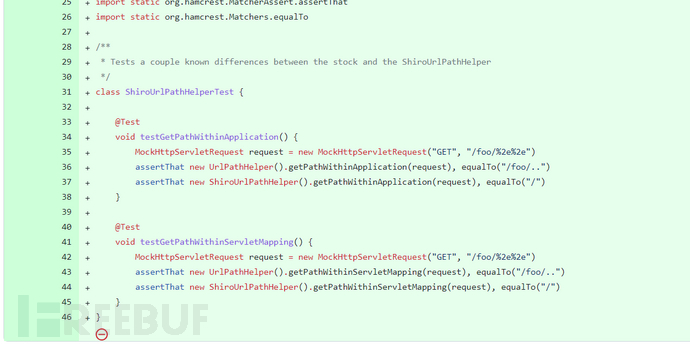
-
其实这里修复的可以说是很差,有点敷衍了事且需要打补丁,具体这里我就不详细写了,有兴趣的师傅可以看 https://xz.aliyun.com/t/11633#toc-42
CVE-2020-17523
漏洞详情
是 CVE-2020-17510 修复后的 bypass,这个漏洞可以使用空格%20进行绕过
我们输入 payload 为http://localhost:8080/toJsonList/%20能够完成越权。
漏洞影响版本
Shiro < 1.7.1
漏洞复现与分析
payloadhttp://localhost:8080/toJsonList/%20
同样的问题,不再赘述了
漏洞修复
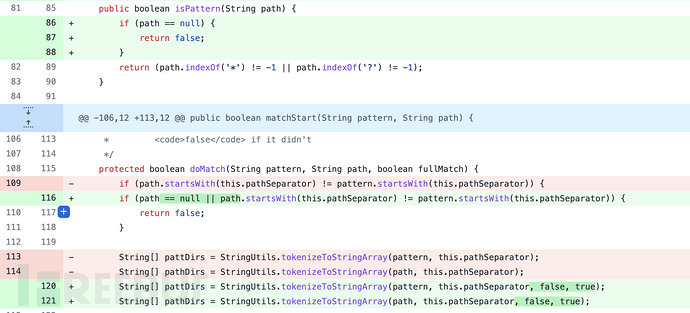
在 Commit中,主要修复点AntPathMatcher.java,在tokenizeToStringArray方法中加了false和true两个参数
这里稍微总结一下,当然也是我自己的吐槽罢了,CVE-2020-13933 这四个类型的洞其实本质上都是同一个洞。
0x09 CVE-2021-41303
漏洞详情
1.8.0之前的 Apache Shiro,在 Spring Boot中使用 Apache Shiro时,特制的 HTTP请求可能会导致身份验证绕过。用户应该更新到 Apache Shiro 1.8.0
漏洞影响版本
Shiro = 1.7.1
环境搭建
需要 ShiroConfig 配置鉴权如下
filterMap.put("/toJsonList/*", "authc");
filterMap.put("/toJsonList/index", "authc");
Controller
@ResponseBody
@GetMapping("/toJsonList/{name}/index")
public String namePage(@PathVariable String name){
    return name;
}
漏洞复现与分析
参考三梦师傅的文章,这里主要是配置文件的利用角度,利用上比较有局限性,且只是 Shiro 1.7.1 版本特有的存在
https://threedr3am.github.io/2021/09/22/%E4%BB%8E%E6%BA%90%E7%A0%81diff%E5%88%86%E6%9E%90Apache-Shiro%201.7.1%E7%89%88%E6%9C%AC%E7%9A%84auth%20bypass%EF%BC%88CVE-2021-41303%EF%BC%89/
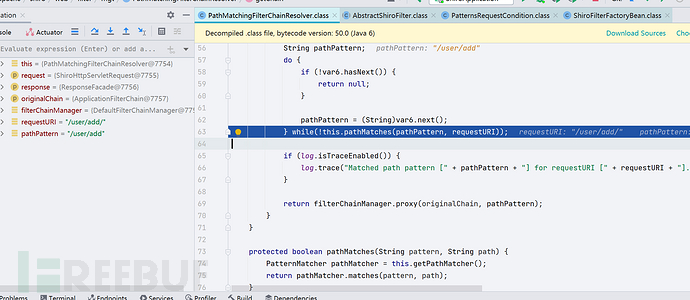
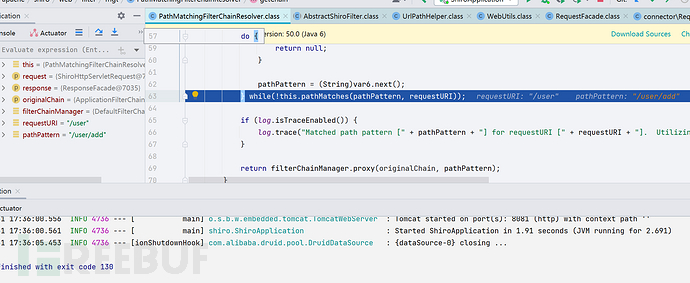
根据threedr3am师傅博客提供的方向,看了一下 Shiro 1.7.1 前后PathMatchingFilterChainResolver#getChain的对比,上面的是 1.7.1 版本的,下面是 1.7.0 版本的
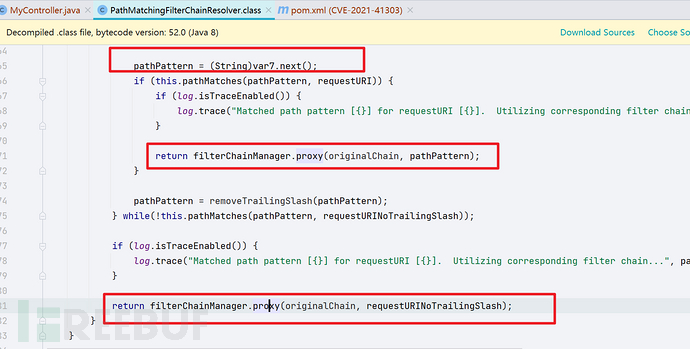
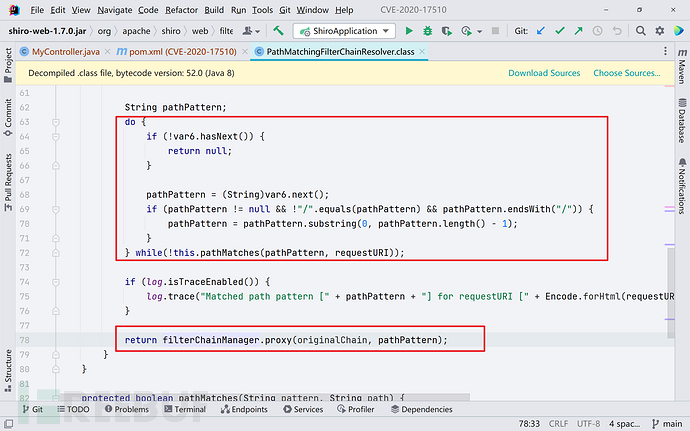
发现在1.7.1版本中,先是对 pathPattern 和 requestURI 进行比较,比较成功,返回:
filterChainManager.proxy(originalChain, pathPattern);
否则对删除尾部斜线的 pathPattern 和 requestURI 进行比较,比较成功,跳出循环,返回:
filterChainManager.proxy(originalChain, requestURINoTrailingSlash);
这就说明了其实我们如果构造两个 shiro 的鉴权,然后让它们经过处理之后能够 bypass 最终的鉴权即可。所以经过之前环境搭建那一步的铺垫,相信师傅们已经知道这个 bypass payload 了,也就是/toJsonList/xxx/index,因为 shiro 的鉴权是从上往下的,先进行toJsonList/*的鉴权判断,再去做toJsonList/index的鉴权,同样不匹配,从而造成 bypass
可是 Spring 还是会将 uri 解读成原本的。
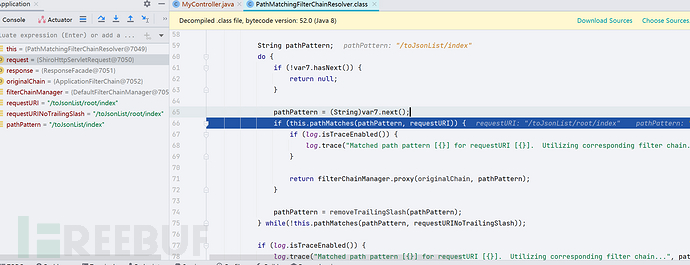
本质上还是由于鉴权出现的逻辑问题而造成的权限绕过
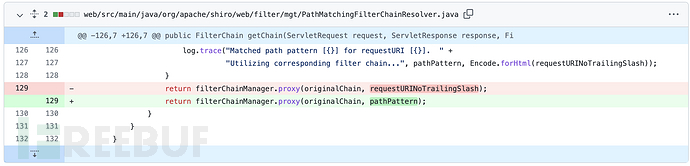
漏洞修复
直接将filterChainManager.proxy的第二个参数改为pathPattern,直接传配置中的uri了
0x10 小结
终于把一系列漏洞复现完了,前面的流程分析起来还是挺有意思的,后面的主要是为自己漏洞挖掘能够提供一些思路。
Ref
https://xz.aliyun.com/t/11633
https://tttang.com/archive/1592
 Copyright © 2005-2021 网信安全世界版权所有